智能视频创作SDK
智能视频创作SDK


- 文档首页
 智能视频创作SDK1.7.0SDK接入指引【iOS】接入指南其它语言接入Objective-C

快速集成EffectOne
下文介绍是基于Objective-C创建工程的快速接入方法,EffectOneSDK集成方式是基于Cocoapods的方式,其他方式请参考 EffectOneKit集成方式
第一步:新建工程、复制代码和资源
打开xcode,新建一个iOS app工程,语言选择
Objective-C,例如工程名叫EffectOne-OC(包名要跟申请EffectOneSDK时的包名保持一致,资源和授权文件请使用从火山产解获取的)基于Objective-C集成的DemoSample中获取SDK相关文件
暂时无法在飞书文档外展示此内容
将
EffectOne-OC目录下的EOExportUI 文件夹、 EOExportUI.podspec、EOLocalResources.bundle 、Podfile复制到新建工程根目录下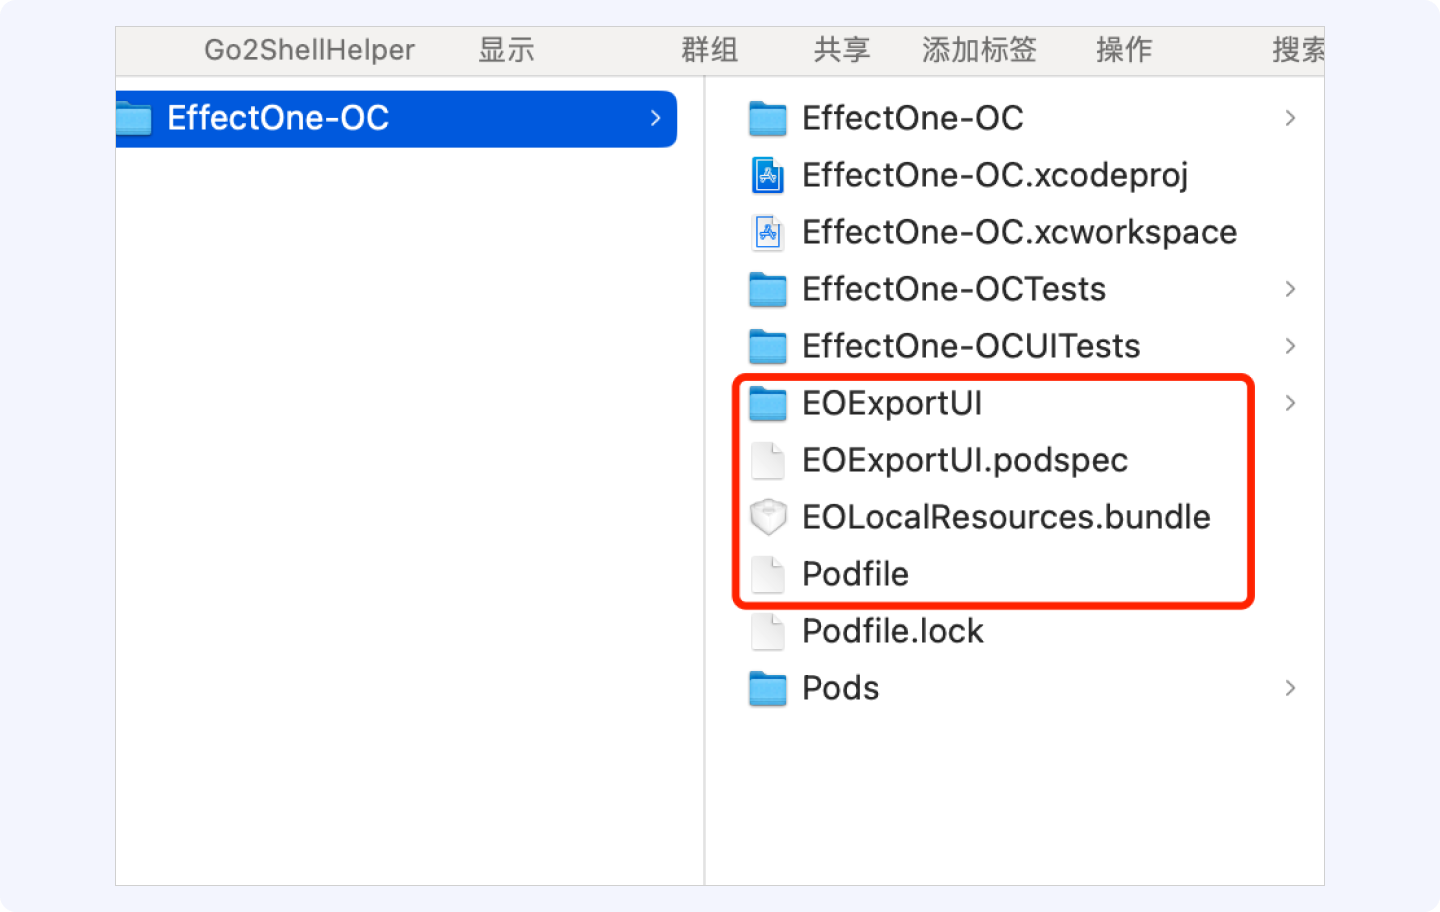
打开Podfile文件,修改成如下图这样,需要将
EffectOne-OC替换成你自己的工程名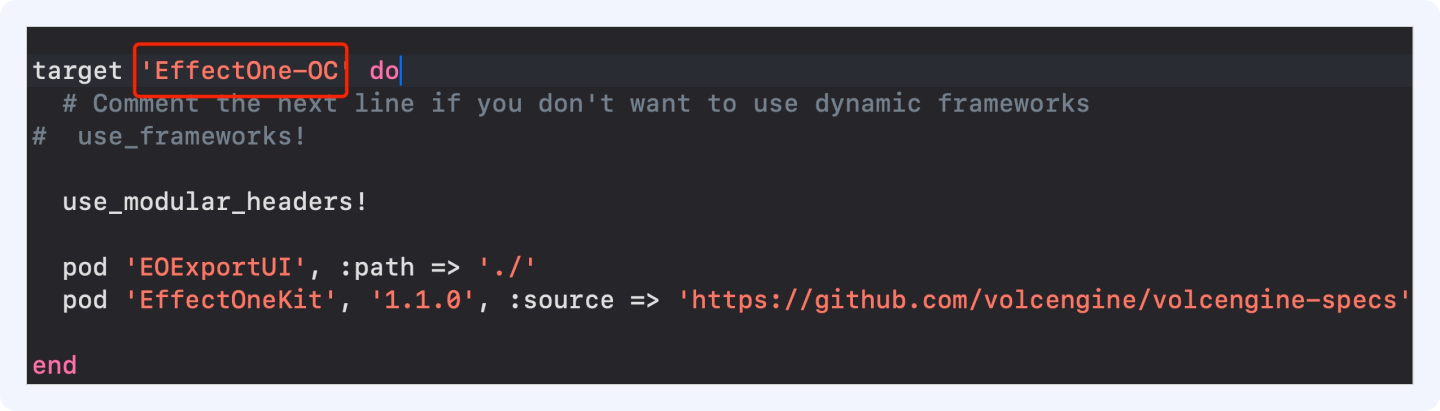
命令行进入
EffectOne-OC工程podfile文件所在的目录,执行pod install --repo-update并 openEffectOne-OC.xcworkspace打开工程.
第二步:将资源包与核心代码加入工程
SDK依赖的特效道具、模型等文件是可以下发的,此处只涉及内置到app内的方式,其他方式参考EffectOne iOS 功能详解中资源导入与配置部分
将
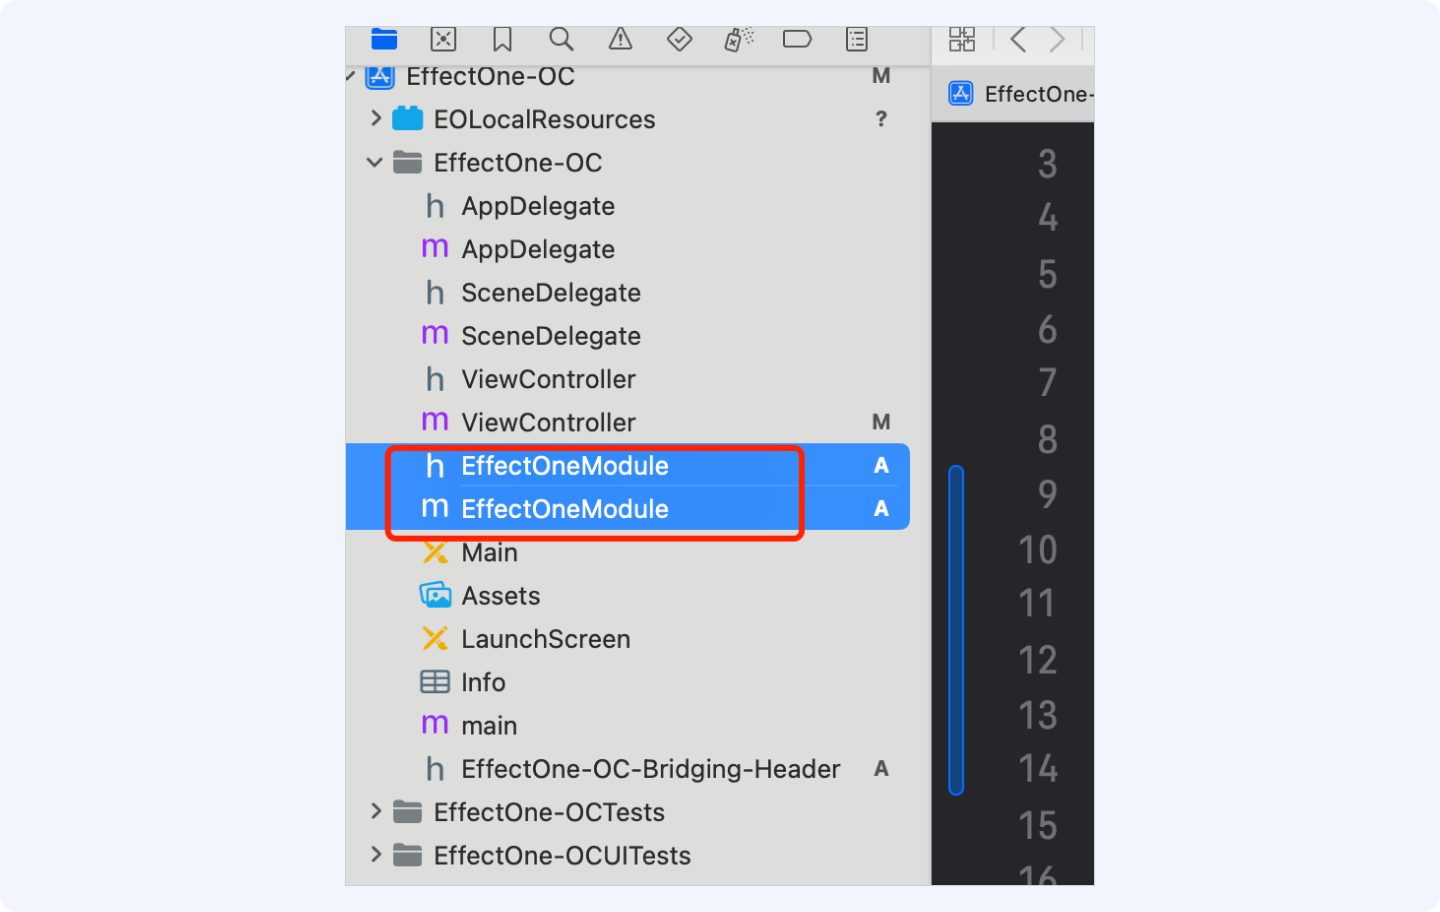
EOLocalResources.bundle导入你的工程中,导入时注意选择"Create folder references",并且保证运行时该bundle直接在主bundle下,不要嵌套于其他文件下面添加
EffectOneModule类,该类负责处理鉴权、拍摄以及进入草稿箱相关逻辑,你可以直接使用EffectOne-OCdemo中的EffectOneModule类
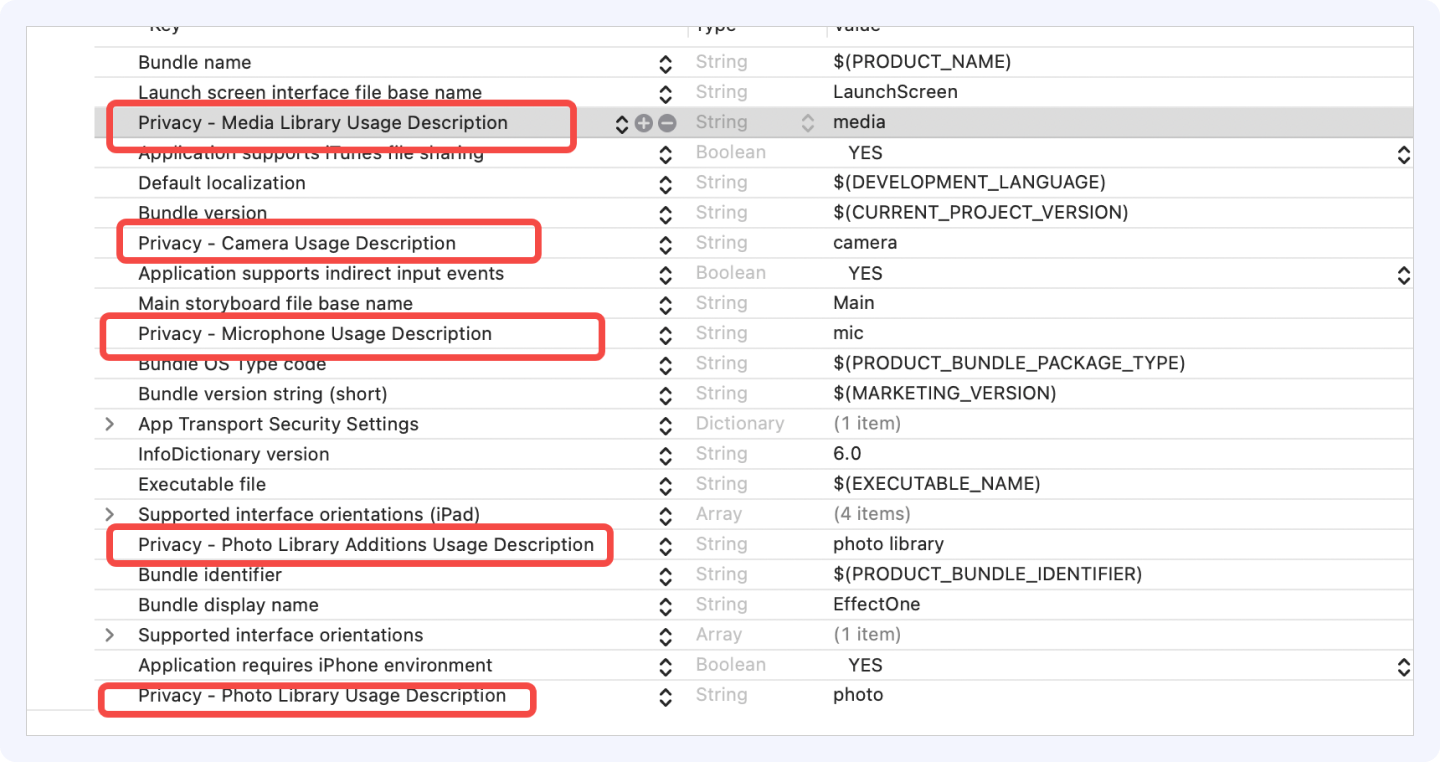
第三步:在工程配置Info中配置相机、麦克风及相册访问权限
- EffectOneKit依赖了相机、麦克风及相册访问权限,需要在你的工程配置中开启,如下图
//是否允许App访问您的媒体资料库
<key>NSAppleMusicUsageDescription</key>
<string>media</string>//写出自己说明描述
//是否允许App使用您的相机
<key>NSCameraUsageDescription</key>
<string>Camera</string>//写出自己说明描述
//是否允许App您的麦克风
<key>NSMicrophoneUsageDescription</key>
<string>mic</string>//写出自己说明描述
//是否允许App保存图片到手机
<key>NSPhotoLibraryAddUsageDescription</key>
<string>photo lib</string>//写出自己说明描述
//是否允许App您的相册
<key>NSPhotoLibraryUsageDescription</key>
<string>photo</string>//写出自己说明描述
第四步:EffectOneModule文件修改(可直接使用基于Objective-C集成的demo中的EffectOneModule文件)
- 添加开启鉴权方法
makeAuth
- (void)makeAuth {
    __weak typeof(self) weakSelf = self;
    EOAuthorizationConfig *config = [[EOAuthorizationConfig alloc] initWithBlock:^(EOAuthorizationConfigInitializer * _Nonnull initializer) {
        initializer.isOnline = NO;
        __strong typeof(self) strongSelf = weakSelf;
        //设置离线证书所在的路径
        initializer.licensePathForOffline = [[strongSelf localBundle] pathForResource:strongSelf.authFileName ofType:nil inDirectory:@"License"];
    }];

    //开始鉴权
    [[EOAuthorization sharedInstance] makeAuthWithConfig:config completionHandler:^(BOOL success, NSString * _Nonnull errMsg) {
        __strong typeof(self) strongSelf = weakSelf;
        strongSelf.isAuthSucceeded = success;
        if (!strongSelf.isAuthSucceeded) {
            NSLog(@"%@",errMsg);
        } else {
            [EOSDK initSDK:^{
                __strong typeof(self) strongSelf = weakSelf;
                [EOSDK setResourceBaseDir:[EOSDK defaultResourceDir:[strongSelf localBundle].bundlePath]];
                [EOSDK setResourceDefaultBuiltInConfig:[EOSDK defaultPanelConfigDir:[strongSelf localBundle].bundlePath]];
            }];
        }
    }];
}
- 添加调用拍摄方法
showRecorderViewController
- (void)showRecorderViewController {
    if (!self.isAuthSucceeded) {
        [self showToast:@"authority is failed!,please check it."];
        return;
    }
    //构造拍摄组件默认配置
    EORecorderConfig *config = [[EORecorderConfig alloc] initWithBlock:^(EORecorderConfigInitializer * _Nonnull initializer) {

    }];

    //显示拍摄页面
    __weak typeof(self) weakSelf = self;
    [EORecorderViewController startRecorderWithConfig:config presenter:self.parentVC delegate:self completion:^(NSError * _Nullable error) {
        __strong typeof(self) strongSelf = weakSelf;
        if (error && strongSelf.parentVC) {
            [strongSelf showErrorAlertWithError:error presenter:strongSelf.parentVC];
        }
    }];
}
- 添加调用草稿箱
showDraftViewController
- (void)showDraftViewController {
   if (!self.isAuthSucceeded) {
       [self showToast:@"authority is failed!,please check it."];
       return;
   }
   //显示草稿组件
   [EODraftBoxController presentDraftVCDelegate:self];
}
第五步:添加鉴权逻辑
- 鉴权逻辑放在ViewController中,在启动其他功能前调用,请将如下代码放入你工程的ViewController文件中
- (EffectOneModule *)effectOneModule {
    if (!_effectOneModule) {
        _effectOneModule = [[EffectOneModule alloc] initWithParentVC:self];
    }
    return _effectOneModule;
}
- (void)viewDidLoad {
    [super viewDidLoad];
    // Do any additional setup after loading the view.
    //开启鉴权
    [self.effectOneModule makeAuth];
    [self.view addSubview:self.recorderButton];
    [self.view addSubview:self.draftButton];
    CGPoint recoderCenter = CGPointMake(self.view.center.x, self.view.center.y - 50);
    self.recorderButton.frame = CGRectMake(0, 0, 120, 40);
    self.recorderButton.center = recoderCenter;

    self.draftButton.frame = CGRectMake(0, 0, 120, 40);
    self.draftButton.center = CGPointMake(recoderCenter.x, recoderCenter.y + 50);
}
- 你的鉴权证书通常放置在EOLocalResources.bundle\License\中,文件名如XXX.licbag,打开EffectOneModule.swift 并将下列代码中字符串替换为"XXX.licbag"
self.authFileName = @"XXX.licbag";
第六步:启动基础编辑
- 新建一个Button控件并在点击事件中调用如下代码启动基础编辑组件。
- (void)showRecorderViewController {
   [self.effectOneModule showRecorderViewController];
}
第七步:启动草稿页面
新建一个Button控件并在点击事件中调用如下代码启动草稿页面。
- (void)showDraftViewController {
   [self.effectOneModule showDraftViewController];
}
可能遇到问题
- 报错

解决方法:build setting搜索ENABLE_USER_SCRIPT_SANDBOXING,YES(默认)改成NO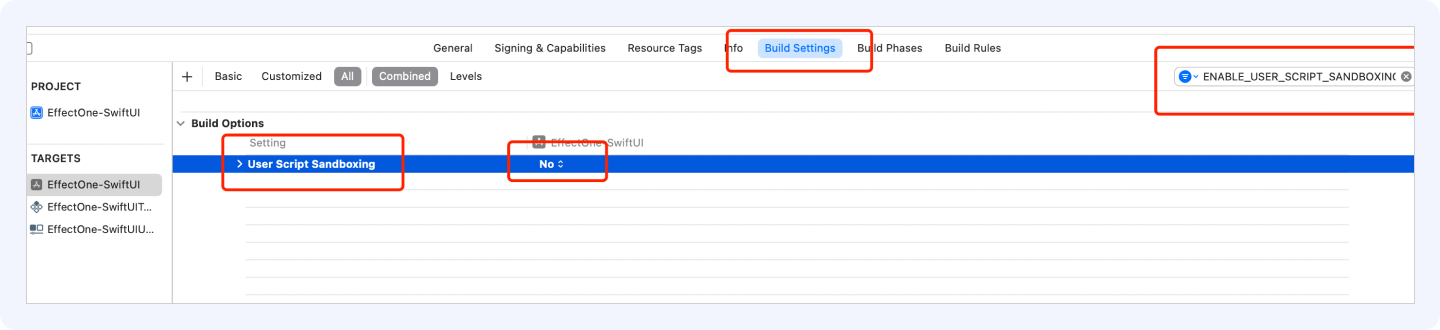
第六步:启动草稿页面
新建一个Button控件并在点击事件中调用如下代码启动草稿页面。
Button("Draft") {
       effectOneModule.showDraftViewController()
    }
可能遇到问题
- 报错

解决方法:build setting搜索ENABLE_USER_SCRIPT_SANDBOXING,YES(默认)改成NO