直播 SDK 提供与智能美化特效联合方案,您可以通过调用直播 SDK 提供的美颜处理接口,快速接入美化特效功能,对本地采集的视频添加美颜、滤镜、贴纸等特效,相较于通过直播 SDK 自定义视频处理功能接入第三方美颜,集成更快捷、使用更方便、效果更佳。
本文介绍如何在直播应用中接入智能美化特效 SDK,并调用直播 SDK 接口实现美颜、滤镜等功能。
前提条件
- 本功能需付费使用,您可通过提交工单联系技术支持获取 4.4.3 及以上版本的 Standard 或 Lite 版智能美化特效 SDK,以及符合业务功能需求的 License 和素材资源包。
说明
完整的授权信息参考智能特效在线授权说明。
- 已在项目中集成了直播 SDK。可参考直播 SDK 集成。
集成智能美化特效 SDK 及资源文件
您需要先集成智能美化 SDK 和资源文件,才可以正常调用直播 SDK 接口实现美颜效果。本章节介绍如何集成智能美化特效 SDK 及其资源文件。
解压 SDK 文件压缩包,找到
effectAAR-release.aar文件。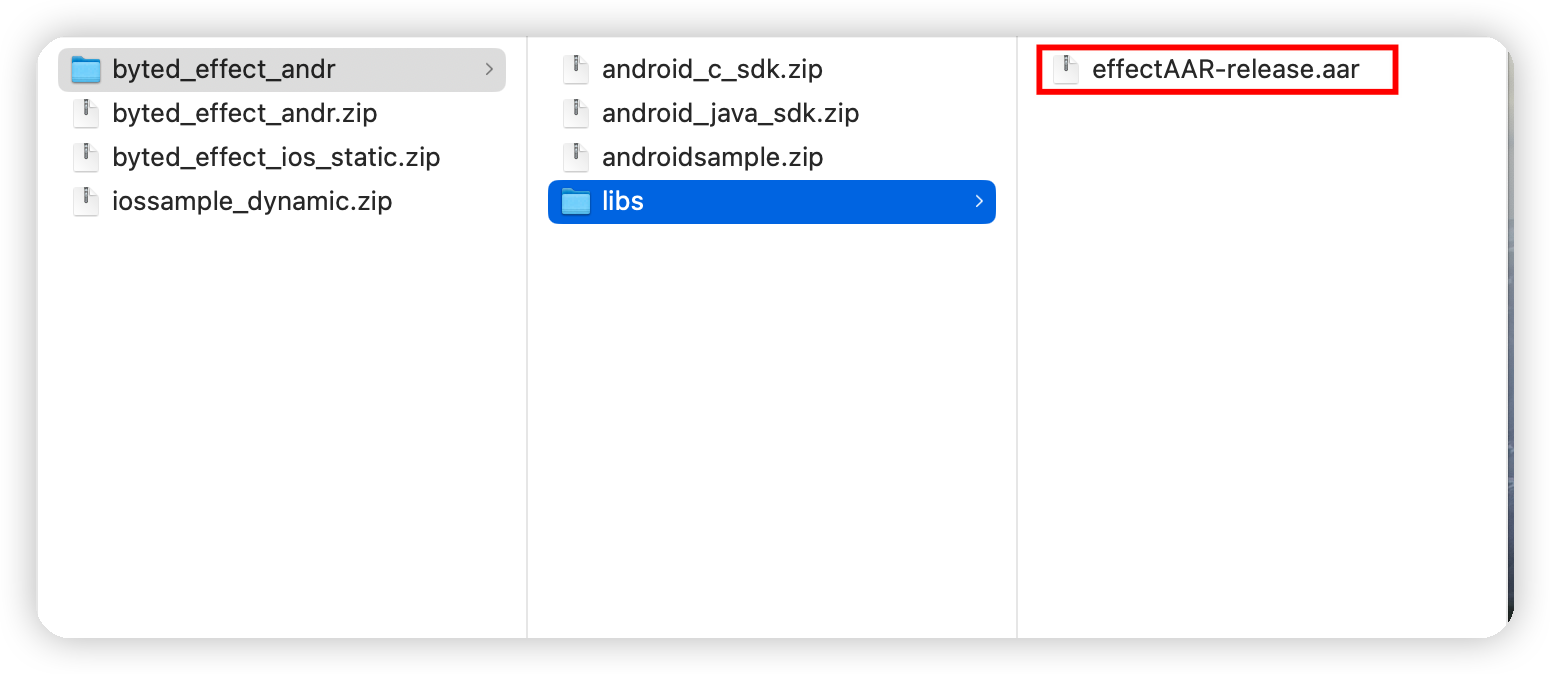
将第 1 步中找到的 AAR 文件拷贝至工程目录下的
app/libs目录内,如果没有libs目录,请新建一份。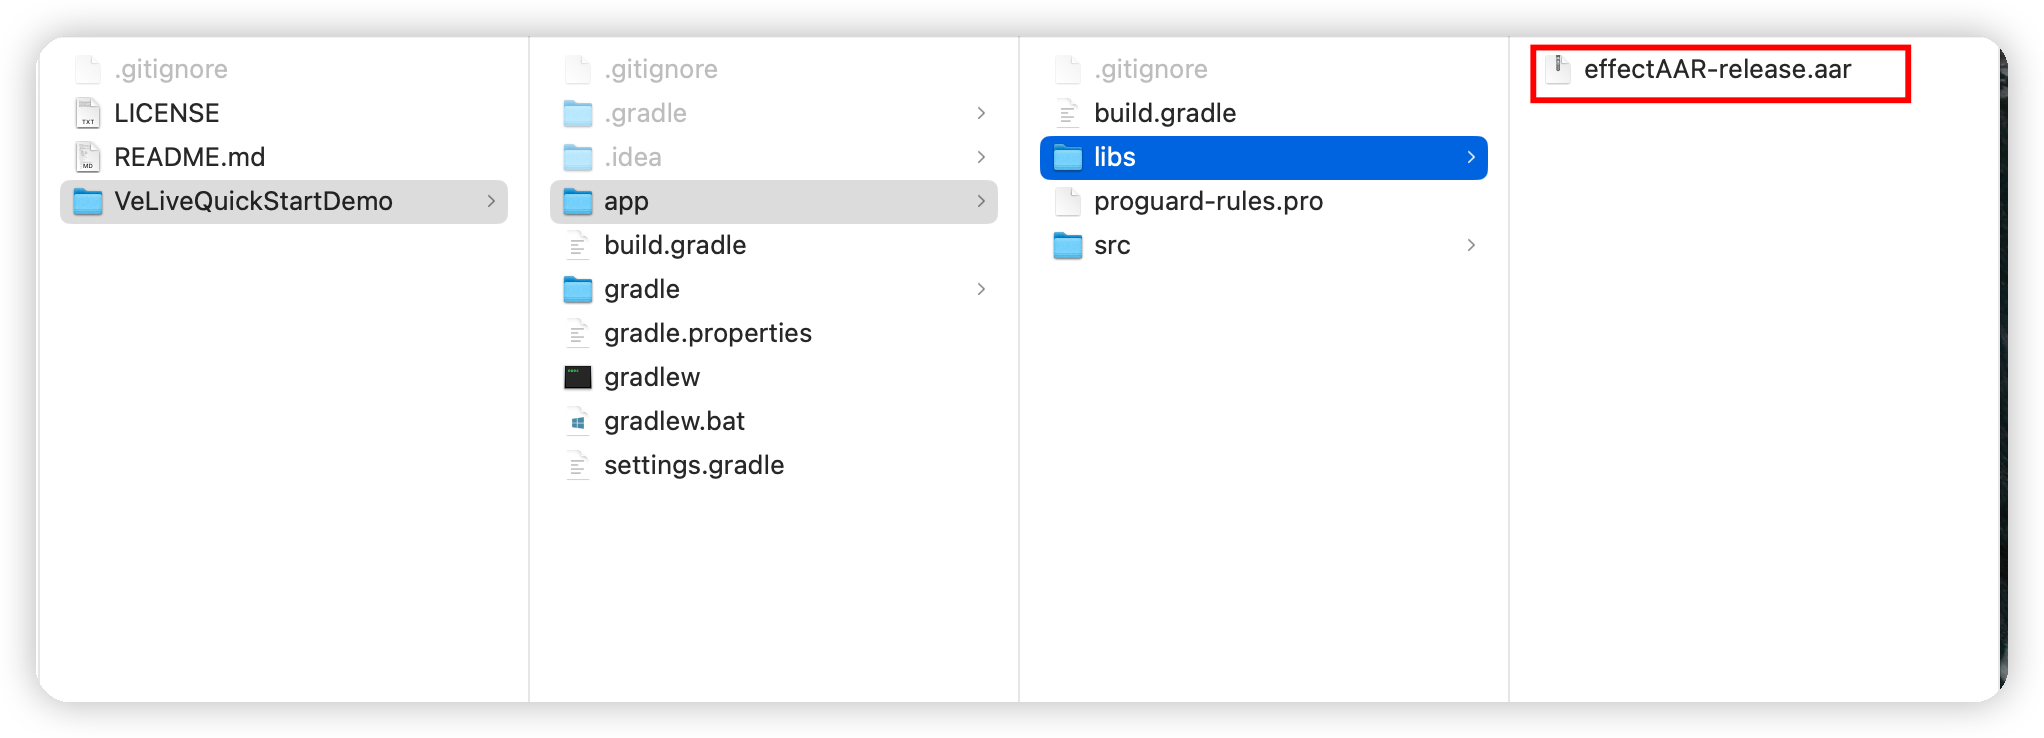
使用 Android Studio 打开工程,编辑 app 的
build.gradle文件,在 depedencies 中新增智能美化特效 SDK 依赖。
dependencies {
	  // ...
    implementation(name: 'effectAAR-release', ext: 'aar')
    // ...
}
解压智能美化特效资源压缩包,解压后的特效资源如下图所示。
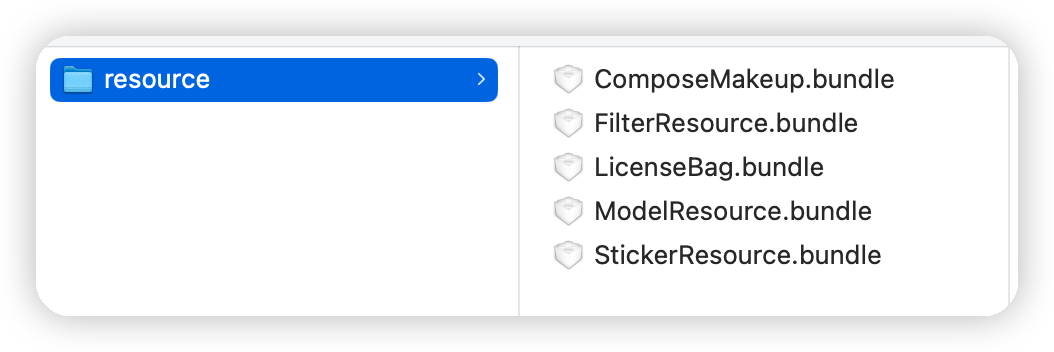
拷贝解压过的资源包到工程 assets 目录下,拷贝后的特效资源如下图所示。

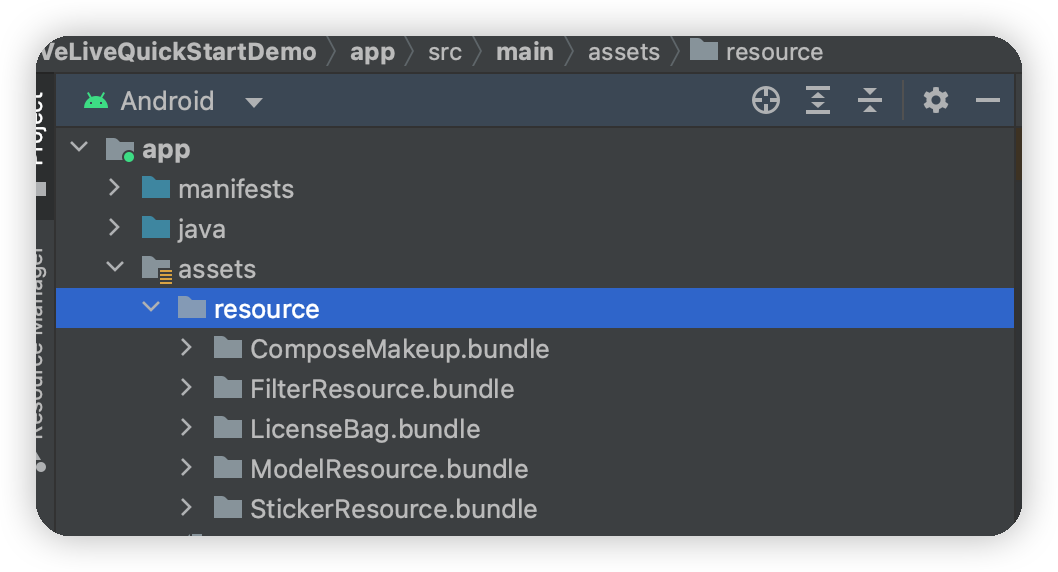
App 启动时,在
VeLiveEffectHelper.initVideoEffectResource();方法中将assets目录下的资源文件复制到外部存储中应用的私有目录storage/xx/"$packageName"/assets/resource/。
package com.ttsdk.quickstart.helper;

import android.content.Context;
import android.text.TextUtils;

import com.pandora.common.env.Env;

import java.io.File;
import java.io.FileInputStream;
import java.io.FileOutputStream;
import java.io.IOException;
import java.io.InputStream;
import java.io.OutputStream;

public class VeLiveEffectHelper {

    /**
     * 获取证书文件路径
     */
    public static String getLicensePath(String name) {
        return Env.getApplicationContext().getExternalFilesDir("assets").getAbsolutePath()
                + "/resource/LicenseBag.bundle/" + name;
    }

    /**
     * 获取模型文件路径
     */
    public static String getModelPath() {
        return Env.getApplicationContext().getExternalFilesDir("assets").getAbsolutePath()
                + "/resource/ModelResource.bundle";
    }

    /**
     * 获取美颜文件路径
     */
    public static String getBeautyPathByName(String subPath) {
        return Env.getApplicationContext().getExternalFilesDir("assets").getAbsolutePath()
                + "/resource/ComposeMakeup.bundle/ComposeMakeup/" + subPath;
    }

    /**
     * 获取贴纸文件路径
     * @param name 贴纸文件名称
     */
    public static String getStickerPathByName(String name) {
        return Env.getApplicationContext().getExternalFilesDir("assets").getAbsolutePath()
                + "/resource/StickerResource.bundle/stickers/" + name;
    }

    /**
     * 获取滤镜文件路径
     * @param name 滤镜文件名称
     */
    public static String getFilterPathByName(String name) {
        return Env.getApplicationContext().getExternalFilesDir("assets").getAbsolutePath()
                + "/resource/FilterResource.bundle/Filter/" + name;
    }

    /**
     * 初始化美颜资源文件
     * 将安装包内的资源文件拷贝到外部存储上
     */
    public static void initVideoEffectResource() {
        Context context = Env.getApplicationContext();
        File versionFile = new File(getExternalResourcePath(), "version");
        if (versionFile.exists()) {
            String oldVer = readVersion(versionFile.getAbsolutePath());
            copyAssetFolder(context, "resource/version", versionFile.getAbsolutePath());
            String newVer = readVersion(versionFile.getAbsolutePath());
            if (TextUtils.equals(oldVer, newVer)) {
                return;
            }
        } else {
            copyAssetFile(context, "resource/version", versionFile.getAbsolutePath());
        }
        updateEffectResource(context);
    }

    private static String readVersion(String fileName) {
        String version = "";
        try {
            FileInputStream fin = new FileInputStream(fileName);
            int length = fin.available();
            byte [] buffer = new byte[length];
            fin.read(buffer);
            version = new String(buffer);
            fin.close();
        } catch(Exception e){
            e.printStackTrace();
        }
        return version;
    }

    private static void updateEffectResource(Context context) {
        File licensePath = new File(getExternalResourcePath(), "LicenseBag.bundle");
        removeFile(licensePath.getAbsolutePath());
        copyAssetFolder(context, "resource/LicenseBag.bundle", licensePath.getAbsolutePath());
        File modelPath = new File(getExternalResourcePath(), "ModelResource.bundle");
        removeFile(modelPath.getAbsolutePath());
        copyAssetFolder(context, "resource/ModelResource.bundle", modelPath.getAbsolutePath());
        File stickerPath = new File(getExternalResourcePath(), "StickerResource.bundle");
        removeFile(stickerPath.getAbsolutePath());
        copyAssetFolder(context, "resource/StickerResource.bundle", stickerPath.getAbsolutePath());
        File filterPath = new File(getExternalResourcePath(), "FilterResource.bundle");
        removeFile(filterPath.getAbsolutePath());
        copyAssetFolder(context, "resource/FilterResource.bundle", filterPath.getAbsolutePath());
        File composerPath = new File(getExternalResourcePath(), "ComposeMakeup.bundle");
        removeFile(composerPath.getAbsolutePath());
        copyAssetFolder(context, "resource/ComposeMakeup.bundle", composerPath.getAbsolutePath());
    }

    private static void removeFile(String filePath) {
        if(filePath == null || filePath.length() == 0){
            return;
        }
        try {
            File file = new File(filePath);
            if(file.exists()){
                removeFile(file);
            }
        }catch (Exception ex){
            ex.printStackTrace();
        }
    }

    private static void removeFile(File file){
        // 如果是文件直接删除
        if(file.isFile()){
            file.delete();
            return;
        }
        // 如果是目录,递归判断,如果是空目录,直接删除,如果是文件,遍历删除
        if(file.isDirectory()){
            File[] childFile = file.listFiles();
            if(childFile == null || childFile.length == 0){
                file.delete();
                return;
            }
            for(File f : childFile){
                removeFile(f);
            }
            file.delete();
        }
    }

    public static String getExternalResourcePath() {
        return Env.getApplicationContext().getExternalFilesDir("assets").getAbsolutePath() + "/resource/";
    }

    public static boolean copyAssetFolder(Context context, String srcName, String dstName) {
        try {
            boolean result = true;
            String fileList[] = context.getAssets().list(srcName);
            if (fileList == null) return false;

            if (fileList.length == 0) {
                result = copyAssetFile(context, srcName, dstName);
            } else {
                File file = new File(dstName);
                result = file.mkdirs();
                for (String filename : fileList) {
                    result &= copyAssetFolder(context, srcName + File.separator + filename, dstName + File.separator + filename);
                }
            }
            return result;
        } catch (IOException e) {
            e.printStackTrace();
            return false;
        }
    }

    public static boolean copyAssetFile(Context context, String srcName, String dstName) {
        try {
            InputStream in = context.getAssets().open(srcName);
            File outFile = new File(dstName);
            OutputStream out = new FileOutputStream(outFile);
            byte[] buffer = new byte[1024];
            int read;
            while ((read = in.read(buffer)) != -1) {
                out.write(buffer, 0, read);
            }
            in.close();
            out.close();
            return true;
        } catch (IOException e) {
            e.printStackTrace();
            return false;
        }
    }

}
调用直播 SDK 接口
本章节介绍如何调用直播 SDK 接口,实现美颜、贴纸等功能。
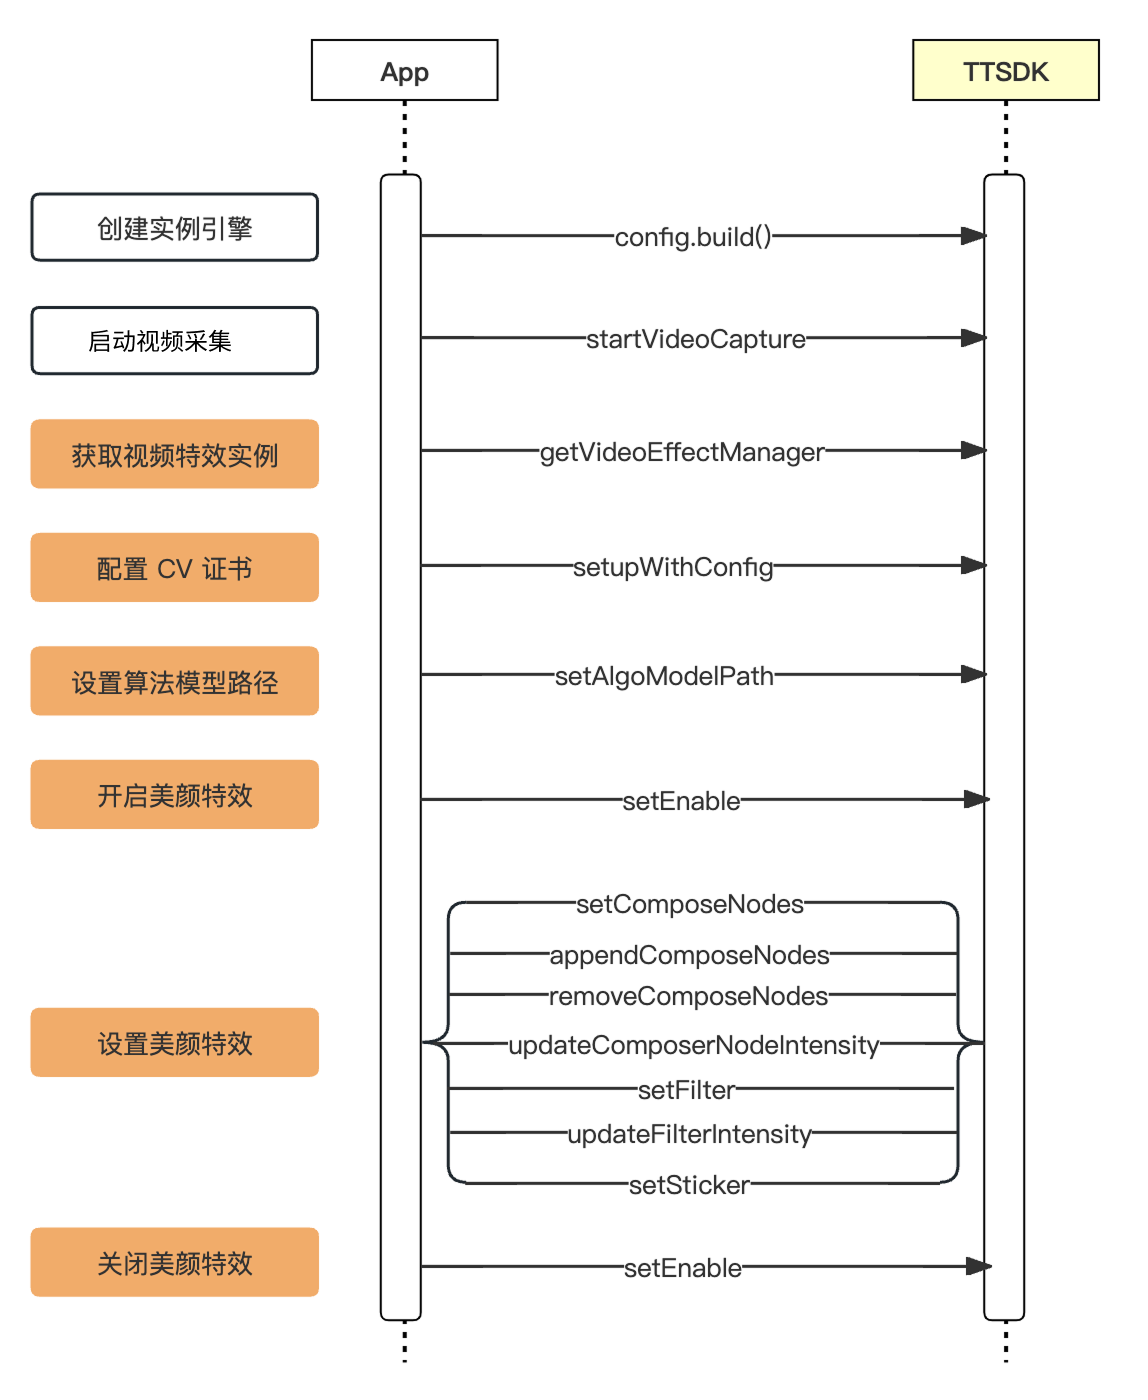
API 时序图
初始化
调用 config.build(); 创建引擎并开启视频采集后,您需先初始化美颜资源,并设置美颜资源和证书路径,方可开启美颜,在本地预览画面中看到美颜效果。您需设置完整的证书文件路径,即指定到具体的证书文件;模型文件路径指定到 ModelResource.bundle 这层即可。
集成完成后,可通过调用 setEnable 查看回调结果,0 表示集成成功,非 0 表示集成失败。
//  推流配置
VeLivePusherConfiguration config = new VeLivePusherConfiguration();
//  配置上下文
config.setContext(this);
//  失败重连次数
config.setReconnectCount(10);
//  创建推流器
mLivePusher = config.build();

//  注意:本方法只在工程中集成过智能美化特效 SDK 时生效
VeLiveVideoEffectManager effectManager = mLivePusher.getVideoEffectManager();
//  License 路径,请根据工程配置查找正确的路径
String licPath = VeLiveEffectHelper.getLicensePath("xxx.licbag");
//  特效模型资源包路径
String algoModePath = VeLiveEffectHelper.getModelPath();
if (!VeLiveSDKHelper.isFileExists(licPath)) {
    return;
}
//  创建美颜配置
VeLivePusherDef.VeLiveVideoEffectLicenseConfiguration licConfig = VeLivePusherDef.VeLiveVideoEffectLicenseConfiguration.create(licPath);
//  设置美颜配置
effectManager.setupWithConfig(licConfig);
//  设置算法包路径
effectManager.setAlgorithmModelPath(algoModePath);
//  开启美颜特效处理
effectManager.setEnable(true, new VeLivePusherDef.VeLiveVideoEffectCallback() {
    @Override
    public void onResult(int result, String msg) {
        if (result != 0) {
            Log.e("VeLiveQuickStartDemo", "Effect init error:" + msg);
        }
    }
});

//  关闭美颜特效处理
effectManager.setEnable(false, new VeLivePusherDef.VeLiveVideoEffectCallback() {
    @Override
    public void onResult(int result, String msg) {
        if (result != 0) {
            Log.e("VeLiveQuickStartDemo", "Effect init error:" + msg);
        }
    }
});
美颜
美颜特效素材存放在 ComposeMakeup.bundle 文件中,您需使用 setComposeNodes 设置素材路径并使用 updateComposerNodeIntensity 更新特效强度才会显示美颜效果。updateComposerNodeIntensity 可以设置的素材 key 可以参考素材 key 对应说明。
注意
资源路径需要指定到 ../ComposeMakeup.bundle/ComposeMakeup/beauty_Android_lite 这层。
//  根据特效资源包,查找正确的资源路径,一般到 `reshape_lite`、`beauty_Android_lite` 目录
String beautyPath = VeLiveEffectHelper.getBeautyPathByName("xxx");
if (!VeLiveSDKHelper.isFileExists(beautyPath)) {
    return;
}
//  设置美颜美型特效资源包
mLivePusher.getVideoEffectManager().setComposeNodes(new String[]{ beautyPath });
//  设置美颜美型特效强度, NodeKey 可在资源包下的 `.config_file` 中获取,如果没有 `.config_file`,请联系商务咨询
mLivePusher.getVideoEffectManager().updateComposerNodeIntensity(beautyPath, "whiten", 0.5F);
滤镜
滤镜特效素材存放在 FilterResource.bundle 文件中,您需使用 setFilter 设置素材路径并使用 updateFilterIntensity 设置滤镜强度后方可显示滤镜效果。
注意
滤镜路径需要指定到特定滤镜名,例如 ../FilterResource.bundle/Filter/Filter_01_38。
//  滤镜资源包,查找正确的资源路径,一般到 `Filter_01_xx` 目录
String filterPath = VeLiveEffectHelper.getFilterPathByName("xxx");
if (!VeLiveSDKHelper.isFileExists(filterPath)) {
    return;
}
//  设置滤镜资源包路径
mLivePusher.getVideoEffectManager().setFilter(filterPath);
//  设置滤镜特效强度
mLivePusher.getVideoEffectManager().updateFilterIntensity(0.5F);
贴纸
贴纸特效素材存放在 StickerResource.bundle 文件中,您需使用的接口为 setSticker 设置素材路径后方可显示贴纸效果。
注意
贴纸路径需要指定到特定贴纸名,例如 ../StickerResource.bundle/stickers/stickers_zhaocaimao。
//  贴纸资源包,查找正确的资源路径,一般到 `stickers_xxx` 目录
String stickerPath = VeLiveEffectHelper.getStickerPathByName("xxx");
if (!VeLiveSDKHelper.isFileExists(stickerPath)) {
    return;
}
//  设置贴纸资源包路径
mLivePusher.getVideoEffectManager().setSticker(stickerPath);
风格妆
风格妆特效素材存放在 ComposeMakeup.bundle 文件中,您需使用 setComposeNodes 设置素材路径并使用 updateComposerNodeIntensity 更新特效强度方可显示风格妆效果。updateComposerNodeIntensity 可以设置的素材 key 可以参考素材 key 对应说明。
注意
风格妆路径需要指定到特定风格妆名,例如 ../ComposeMakeup.bundle/ComposeMakeup/style_makeup/aidou。
//  根据特效资源包,查找正确的资源路径,一般到 `style_makeup` 目录
String beautyPath = VeLiveEffectHelper.getBeautyPathByName("style_makeup/aidou");
if (!VeLiveSDKHelper.isFileExists(beautyPath)) {
    return;
}
//  设置美颜美型特效资源包
mLivePusher.getVideoEffectManager().setComposeNodes(new String[]{ beautyPath });
//  设置美颜美型特效强度, NodeKey 可在资源包下的 `.config_file` 中获取,如果没有 `.config_file`,请联系商务咨询
mLivePusher.getVideoEffectManager().updateComposerNodeIntensity(beautyPath, "Filter_ALL", 0.5F);
mLivePusher.getVideoEffectManager().updateComposerNodeIntensity(beautyPath, "Makeup_ALL", 0.5F);