❗️注意:该文档支持的 Taro 版本为 3.x,其他版本支持可联系对接产品

打开 GMP 系统,进入「管理中心」 -> 「通道管理」 -> 「微信小程序」 -> 「新增小程序接入」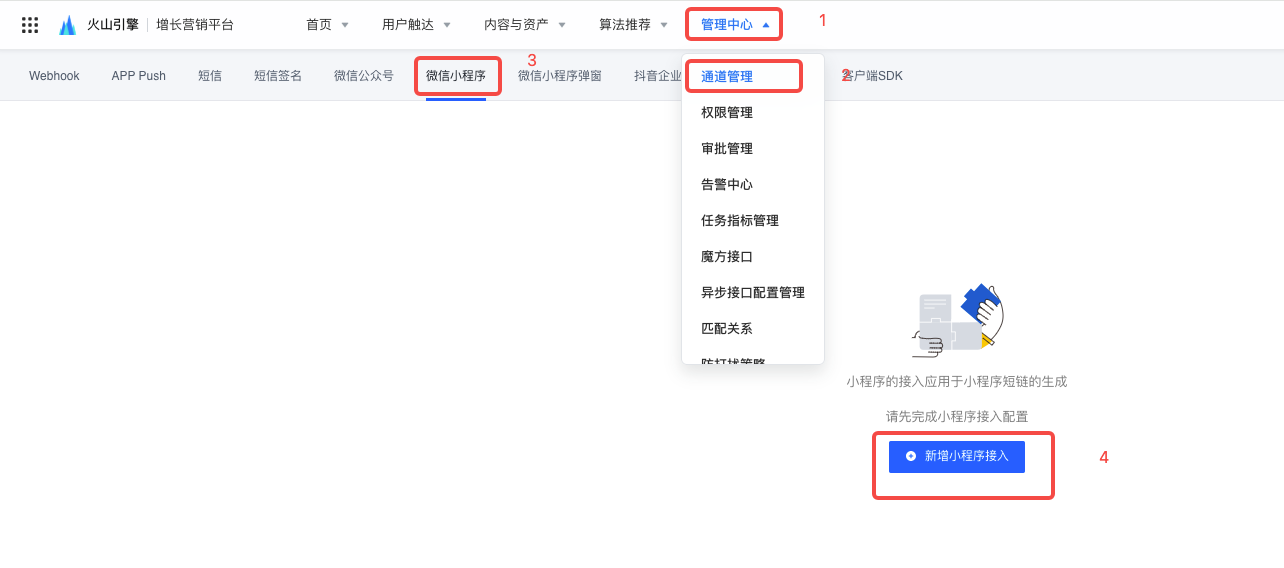
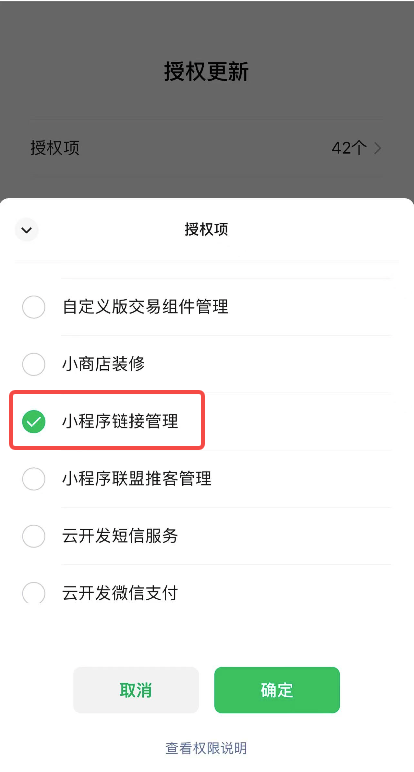
授权时,必须勾选「获取小程序码」、「小程序基本信息管理」、「小程序链接管理」这三个权限,其他权限为可选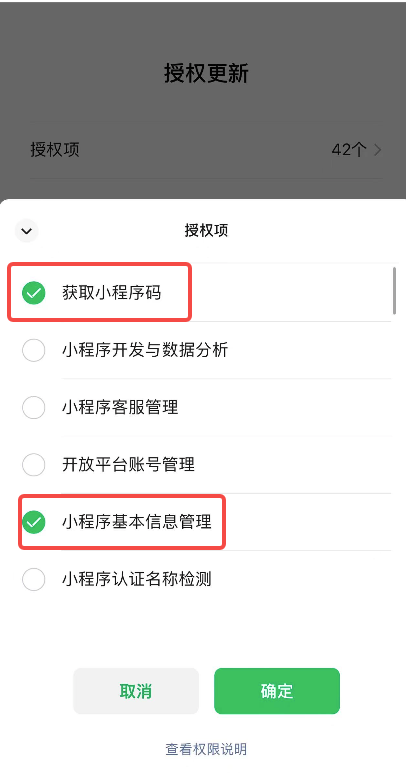
3.1 接入 Finder SDK(可选)
❗️注意:此步骤可选,如果有在用的 UBA ,不使用 Finder ,则可以不接入
1、在项目根目录下安装 @datarangers/sdk-mp:
npm install @datarangers/sdk-mp
3.2 接入弹窗 SDK
1、在 Taro 项目根目录下安装 @byte-gmp/gmp-mini-popup:
npm install @byte-gmp/gmp-mini-popup
2、将 node_modules/@byte-gmp/gmp-mini-popup/dist/components 目录搬运到 Taro 项目 src 路径下并改名,例如改为:gmp-popup,则项目目录看起来如下: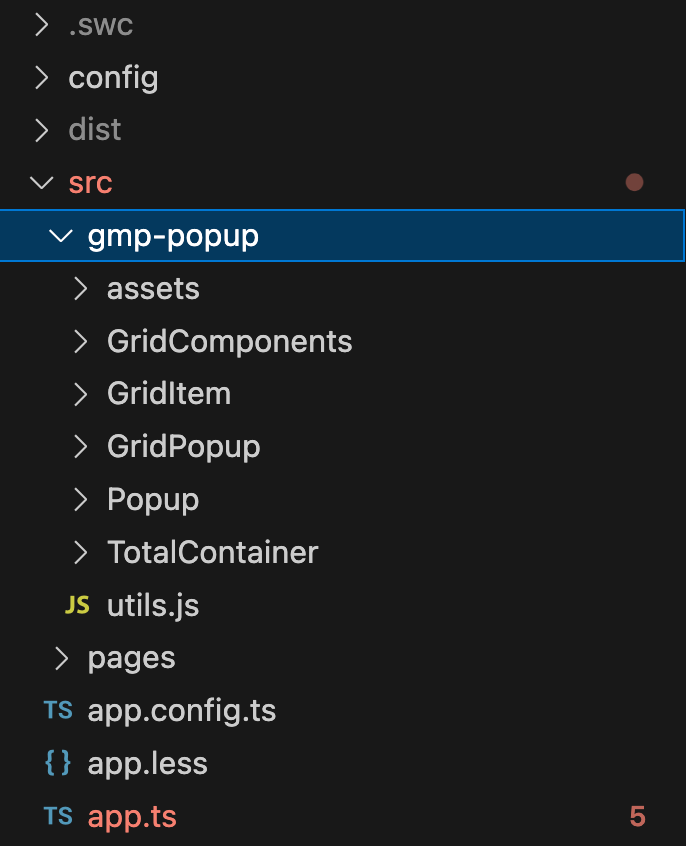
3、在项目根目录 app.ts 里引入
import GmpSdk from "@byte-gmp/gmp-mini-popup";

// 如果 3.1 步骤有接入Finder SDK,则需要下面引入
import $$Rangers from "@datarangers/sdk-mp";

let sdk;
if (Taro.getEnv() === Taro.ENV_TYPE.WEAPP) {
  // 如果 3.1 步骤有接入Finder SDK,则需要下面 init 方法
  // 参数配置参考 3.4.1
  $$Rangers.init({
    app_id: 10000026, // 注意类型是number而非字符串
    channel_domain: 'https://xxx.com', // 按文档替换为真实链接,
    log: false, // 是否开启日志打印
    auto_report: true, // 是否开启预置事件采集
    enable_ab_test: false,
  });
  // GmpSdk.init 参数配置参考 3.4.2
  sdk = GmpSdk.init({
    finderRangers: $$Rangers,
    appId: 1,
    mainAccountId: -1,
    wechatAppId: 'wxbee437cfe27aec01', // 替换为「步骤2」接入到 GMP 小程序的 wechatAppId
    origin: 'https://xxx.com', // 按文档替换为真实链接,
    finderAppId: 10000026, // 注意类型是number而非字符串
    operatingMode: 'Auto',
    initPage: 'pages/index/index',
    customEventTrigger(key, params) {
      console.log(key, 'customEventTrigger', params);
    },
    success(res) {
      console.log(res, 'success');
    },
    fail(res) {
      console.log(res, 'fail');
    },
    error(e) {
      console.log(e, 'e');
    },
  });
  // 如果设置完毕,就可以调用send方法标记可以上报事件了。
  // 在SDK的初始化流程中,send方法必须被调用执行过,否则所有事件都不会上报
  $$Rangers.send();
}

App({
  constructor(props) {
    super(props);

    // 将 弹窗SDK 实例也挂载到全局
    // 这里命名必须与视图 SDK 组件传入的 key 保持一致,如:
    // <gmp-popup gmpEventKey="gmp" />,则这里属性名为 gmp
    (this as any).gmp = sdk;

    // 将 finder 实例挂载到全局
    (this as any).$$Rangers = $$Rangers;

    if (Taro.getEnv() === Taro.ENV_TYPE.WEAPP) {
      Taro.login({
        success: res => {
          if (res.code) {
            console.log(res.code, 'res.code');

            // 参数配置见 3.4.3
            GmpSdk.config({
              code: res?.code,
            });

            // 参数配置见 3.4.4
            GmpSdk.on((key: string) => {
              console.log('reportKey:', key);
            });
          } else {
            console.log(`登录失败!${res.errMsg}`);
          }
        },
        fail: res => {
          console.log(res);
        },
      });
    }
  }
});
3.3 引入弹窗组件
以首页
pages/index/index弹窗为例
在 Taro 项目根目录 app.config.ts 文件配置 usingComponents 如下:
// app.config.ts
export default {
  usingComponents: {
    'gmp-popup': './gmp-popup/Popup',
  },
};
在pages/index/index.tsx 文件中引入
❗️注意:在 3.2 中挂载的代码片段 (this as any).gmp = sdk,属性名 为 gmp,刚好对应下面传入
import React, { Component } from 'react';
import { View, Block } from '@tarojs/components';
import './index.less';

export default class Index extends Component {
  render() {
    return (
      <Block>
        <View className="index"></View>
        <gmp-popup gmpEventKey="gmp" />
      </Block>
    );
  }
}
3.4 API
3.4.1 $$Rangers.init 参数
| 参数名 | 参数类型 | 必填 | 说明 |
|---|---|---|---|
app_id | number | 是 | finderAppId,业务产品的唯一标识,获取方式可见 3.4.5 |
channel_domain | string | 是 | finder 上报域名,获取方式可见3.4.5 |
log | boolean | 否 | 设置true后,控制台会打印调试信息 |
auto_report | boolean | 否 | 自动上报,设置true后,会自动上报预定义事件,如app_launch、app_terminate、predefine_pageview、on_share等事件 |
enable_ab_test | boolean | 否 | 设置true后,会开启ab实验功能,包括使用getVar、getAllVars等api |
3.4.2 GmpSdk.init 参数
| 参数名 | 参数类型 | 必填 | 说明 |
|---|---|---|---|
finderRangers | - | 是 | 上述 $$Rangers.init({})方法返回的 finder 实例 |
appId | number | 是 | GMP 的项目 ID,获取方式可见3.4.5 |
mainAccountId | number | 是 | 租户 ID,仅在Saas情况下存在。私域部署情况下填 -1,获取方式可见3.4.5 |
wechatAppId | string | 是 | 1.1 步骤接入 GMP 小程序的 wechatAppId |
origin | string | 是 | 数据请求地址,注意地址协议必须为 https ,格式如: https://${GMP系统域名}/gmp,获取方式可见3.4.5 |
|
| 是 | 成功回调函数,在此需要将返回值挂载到App上,且挂载的名称需要和后续调用SDK组件时传递的 key 保持一致 |
webId | string | 否 | 设备ID |
fail | (res: Error) => void; | 否 | 失败回调函数 |
error | (res: Error) => void; | 否 | 出现错误时回调函数 |
|
| 否 | 操作模式,默认为自动模式 |
|
| 否 | 当选择手动模式后,SDK会将弹窗 |
|
| 否 | 初始化弹窗时,若有事件,会希望在哪个页面弹窗(一般传首页 'pages/index/index' ) |
3.4.3 GmpSdk.config 参数
| 参数名 | 参数类型 | 必填 | 说明 |
|---|---|---|---|
code | string | 是 | Taro.login 配置的 success 回调函数返回的 res.code |
3.4.4 GmpSdk.on
| 参数名 | 参数类型 | 必填 | 说明 |
|---|---|---|---|
|
| 是 | 选择手动模式时(即 |
3.4.5 SDK 参数获取
在 GMP 打开「管理中心」 -> 「通道管理」 -> 「微信小程序弹窗」 -> 「SDK参数」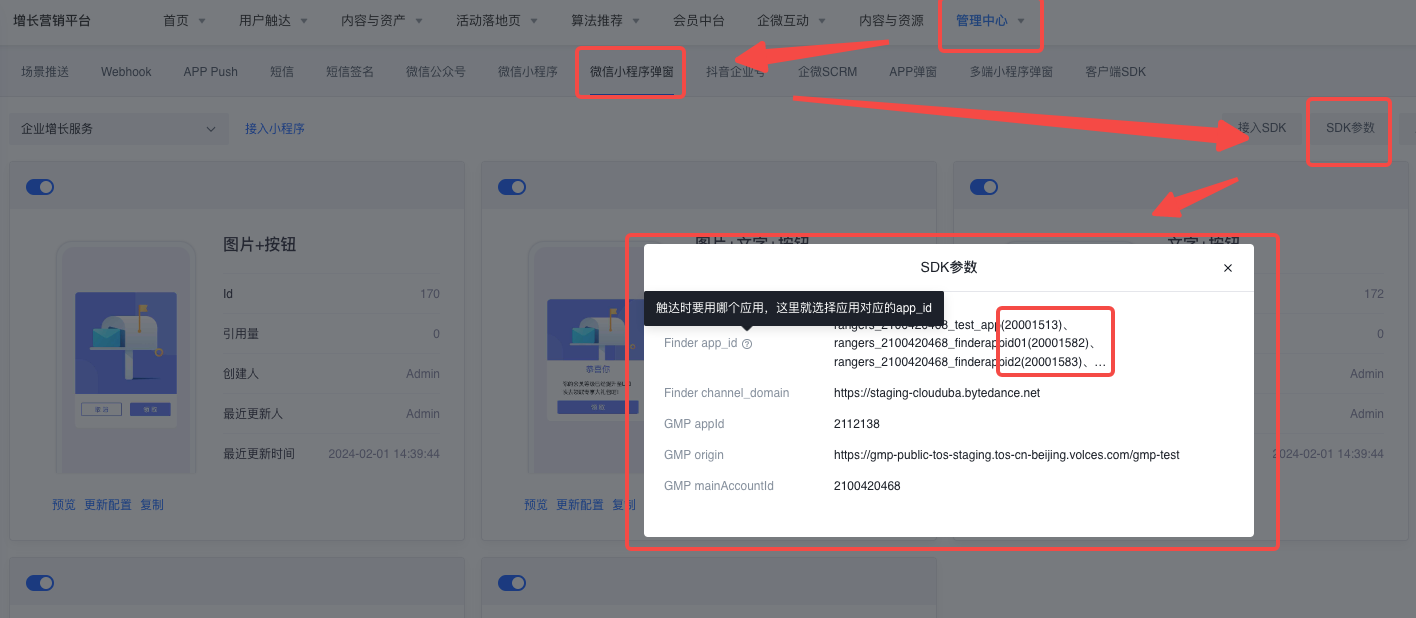
其中,Finder app_id 的值可能有多个,触达时要用哪个应用,这里就选择应用对应后面括号里的 app_id
3.4.6 手动模式
GmpSdk.init 设置为 'Manual',则进入手动模式。手动模式在调用 GmpSdk.config之后,需要使用 GmpSdk.on 方法进行监听,如果有弹窗将要弹出时,会将 弹窗 Key 以回调函数参数的形式给出来,例如:
constructor(props) {
   super(props);

   // 将 弹窗SDK 实例也挂载到全局
   // 这里命名必须与视图 SDK 组件传入的 key 保持一致,如:
   // <gmp-popup gmpEventKey="gmp" />,则这里属性名为 gmp
   (this as any).gmp = sdk;

   // 将 finder 实例挂载到全局
   (this as any).$$Rangers = $$Rangers;

   const that = this;
   if (Taro.getEnv() === Taro.ENV_TYPE.WEAPP) {
     Taro.login({
       success: res => {
         if (res.code) {
           console.log(res.code, 'res.code');

           // 参数配置见 3.4.3
           GmpSdk.config({
             code: res?.code,
           });

           // 参数配置见 3.4.4
           GmpSdk.on((key: string) => {
             // 这里 key 可以做任意处理,比如存到全局变量中
             console.log('reportKey:', key);

             // 可以在这里做任何逻辑

             // 需要弹窗的时候调用以下方法可以触发弹窗
             that.gmp.triggerPopupData(key);
           });
         } else {
           console.log(`登录失败!${res.errMsg}`);
         }
       },
       fail: res => {
         console.log(res);
       },
     });
   }
 }
3.4.7 上报 params
在手动上报时,可调用如下 SDK 方法 eventTrigger 方法触发上报
getApp().$app.gmp.eventTrigger(key, params)

// 使用示例,例如上报事件名为'request_status__', 事件附带属性为 {path: 'pages/index/index', a: 'xxx', b: 'xxx'}
getApp().$app.gmp.eventTrigger('request_status__', {
  path: 'pages/index/index',
  a: 'xxx',
  b: 'xxx'
})
其中参数分别为:
| 参数名 | 参数类型 | 必填 | 说明 |
|---|---|---|---|
|
| 是 | 事件名。例如想触发 |
params | Record<string, string | number> | 否 | 触发事件时携带的属性。例如触发 request_status__ 事件时,希望带上属性名 path 和属性值 'pages/index/index' 代表触发时所在的页面,可以写为 {path: 'pages/index/index'} |
在「小程序后台」- 「开发」 - 「开发管理」 - 「服务器域名」中,将上述 3.4.1 中 channel_domain(Finder 上报域名),3.4.2 中 origin (GMP 域名),配置到「request 合法域名」里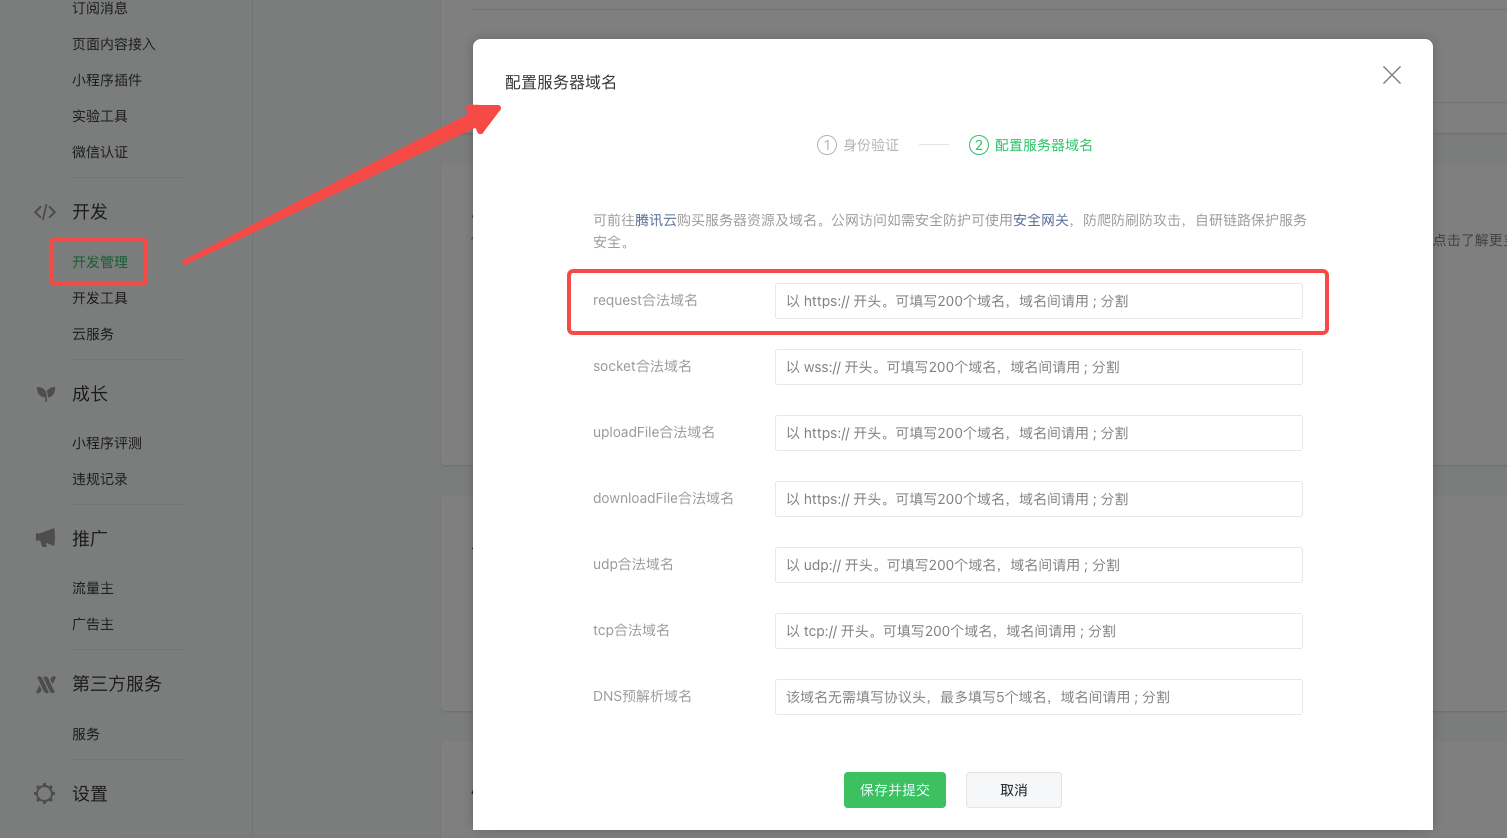
5.1 创建触达任务
❗️注意:测试之前,必须先确保已经导入行为事件;测试只限在小程序本地调试、体验版进行,不能直接发布正式版
创建「触达任务」,选择「微信小程序弹窗」和 「任务关联应用」(未购买 Finder 可忽略,与 3.4.1 参数 app_id 保持一致),点击「确定」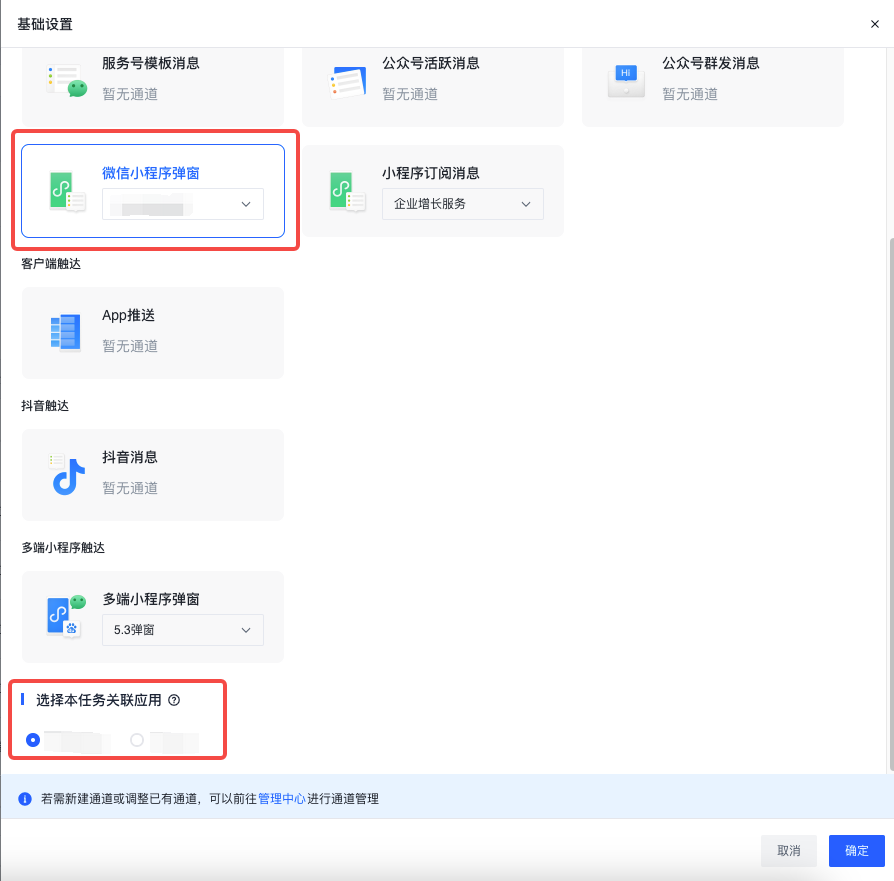
选择「受众用户」(建议选择「全部用户」进行测试验证)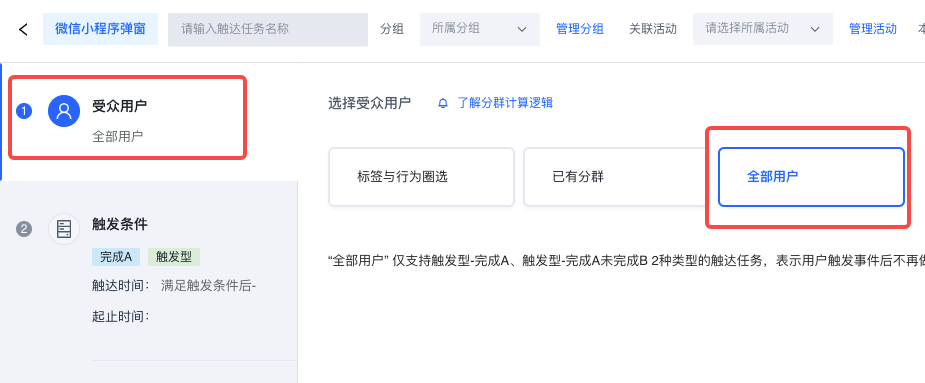
触发条件中选择任一事件,并记住这里的「事件英文名」,如图中为 request_status__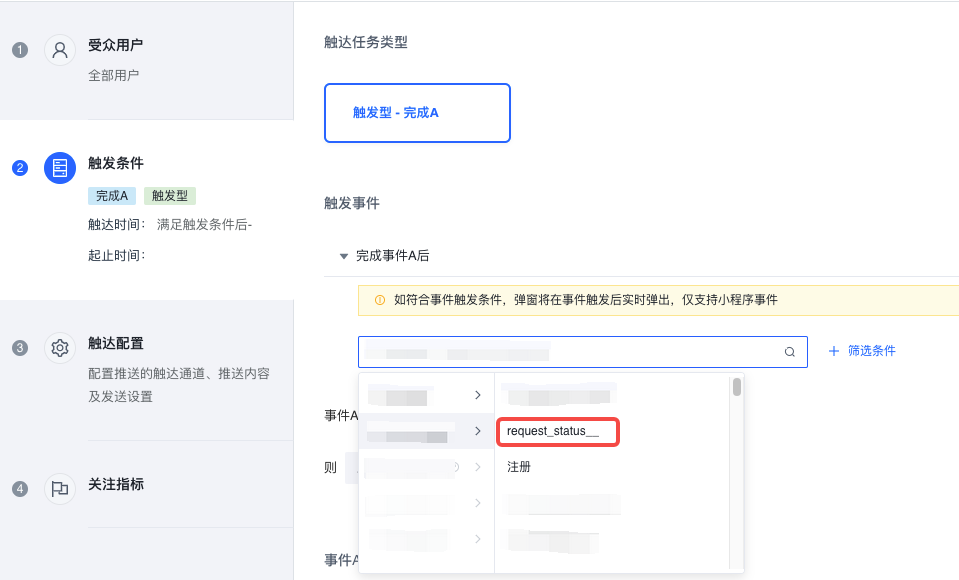
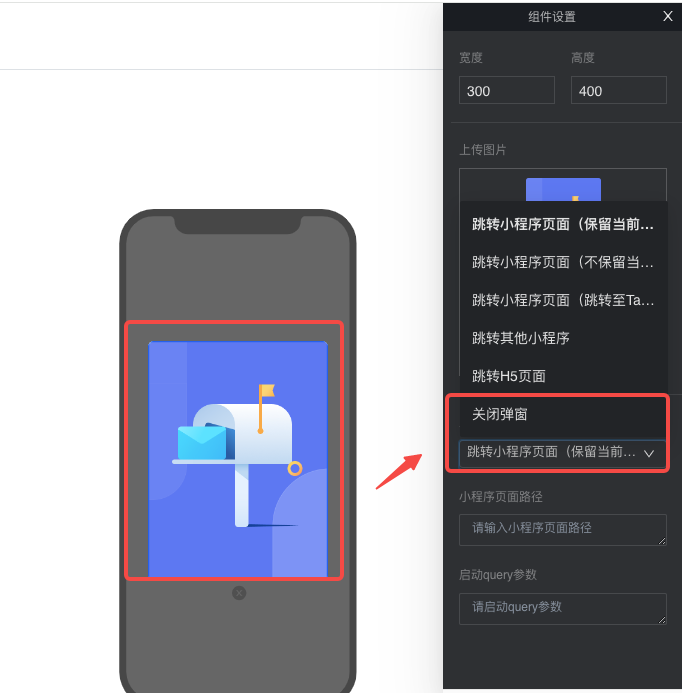
触达配置选择任一模板,点击弹窗,编辑「点击行为」为「关闭弹窗」,然后创建触达任务并审批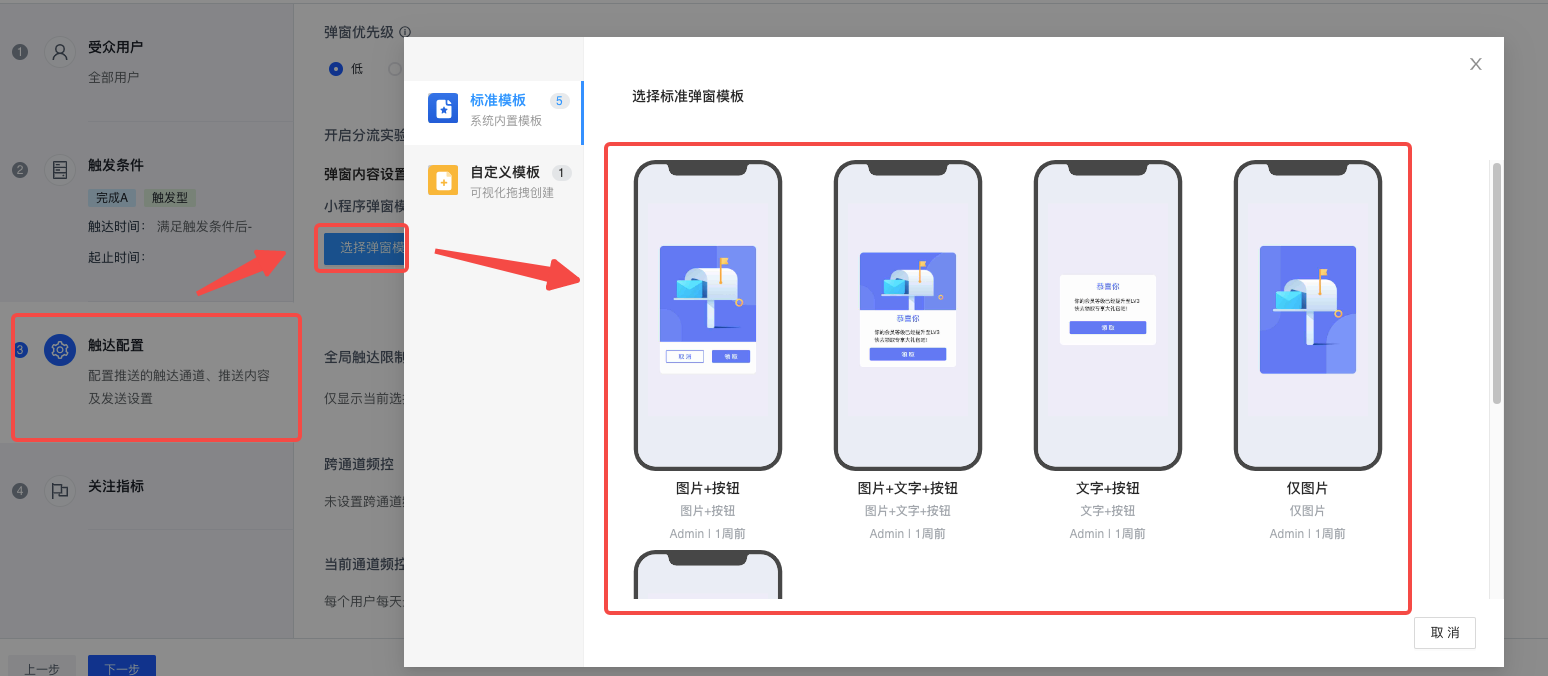
5.2 任务弹窗测试
5.2.1 使用 Finder SDK的场景
在「引入弹窗组件」(即引入 <gmp-popup> 组件)的页面代码里(例如首页是 pages/index/index.tsx),加入下述代码,触发 4.1 中创建触达任务选择的事件英文名,本例子为:request_status__
componentDidMount(): void {
  // 本例子中以下 eventName 为 request_status__
  getApp().$app.$$Rangers.event('eventName');
}
如果弹出弹窗,则代表接入测试成功,可以把上述测试代码删除,创建正式触达任务弹窗
5.2.2 自带 UBA 的场景
在 UBA 监听到事件触发时,手动触发 GMP SDK 的 eventTrigger 方法,key 为事件名,本例子为:request_status__
// UBA 监听事件触发之后插入下面代码:
// key 表示事件名,本例子中以下 key 为 request_status__
// params 指触发事件时某些属性的值,非必传,用法可参考 3.4.7
getApp().$app.gmp.eventTrigger(key, params)
如果弹出弹窗,则代表接入测试成功,可以创建正式触达任务弹窗
5.3 测试完整代码
// app.ts
import { Component } from 'react';
import Taro from '@tarojs/taro';
import $$Rangers from '@datarangers/sdk-mp';
import GmpSdk from '@byte-gmp/gmp-mini-popup';
import './app.less';

let gmp;
if (Taro.getEnv() === Taro.ENV_TYPE.WEAPP) {
  $$Rangers.init({
    app_id: 10000026, // 注意类型是number而非字符串
    channel_domain: 'https://xxxx.com', // 按文档替换为真实链接,
    log: false, // 是否开启日志打印
    auto_report: true, // 是否开启预置事件采集
    enable_ab_test: false,
  });
  gmp = GmpSdk.init({
    finderRangers: $$Rangers,
    appId: 1,
    mainAccountId: -1,
    wechatAppId: 'wxbee437cfe27aec01',
    origin: 'https://xxxx.com/gmp', // 按文档替换为真实链接,
    finderAppId: 10000026, // 注意类型是number而非字符串
    operatingMode: 'Auto',
    initPage: 'pages/index/index',
    customEventTrigger(key, params) {
      console.log(key, 'customEventTrigger', params);
    },
    success(res) {
      console.log(res, 'success');
    },
    fail(res) {
      console.log(res, 'fail');
    },
    error(e) {
      console.log(e, 'e');
    },
  });
  $$Rangers.send();
}

// 如果设置完毕,就可以调用send方法标记可以上报事件了。
// 在SDK的初始化流程中,send方法必须被调用执行过,否则所有事件都不会上报

class App extends Component {
  constructor(props) {
    super(props);

    (this as any).gmp = gmp;
    (this as any).$$Rangers = $$Rangers;
    (this as any).reportPopupKey = '';

    if (Taro.getEnv() === Taro.ENV_TYPE.WEAPP) {
      Taro.login({
        success: res => {
          if (res.code) {
            console.log(res.code, 'res.code');

            GmpSdk.config({
              code: res?.code,
            });

            GmpSdk.on((key: string) => {
              (this as any).reportPopupKey = key;
              console.log('reportKey:', key);
            });
          } else {
            console.log(`登录失败!${res.errMsg}`);
          }
        },
        fail: res => {
          console.log(res);
        },
      });
    }
  }

  // this.props.children 是将要会渲染的页面
  render() {
    return this.props.children;
  }
}

export default App;

// app.config.ts
export default {
  pages: ['pages/index/index'],
  window: {
    backgroundTextStyle: 'light',
    navigationBarBackgroundColor: '#fff',
    navigationBarTitleText: 'WeChat',
    navigationBarTextStyle: 'black',
  },
  usingComponents: {
    'gmp-popup': './gmp-popup/Popup',
  },
};

// pages/index/index.tsx
import React, { Component } from 'react';
import { View, Block } from '@tarojs/components';
import './index.less';

export default class Index extends Component {
  componentDidMount(): void {
    getApp().$app.$$Rangers.event('request_status__');
  }

  render() {
    return (
      <Block>
        <View className="index">GMP SDK taro原生弹窗</View>
        <gmp-popup gmpEventKey="gmp" />
      </Block>
    );
  }
}
5.4 弹窗效果示例
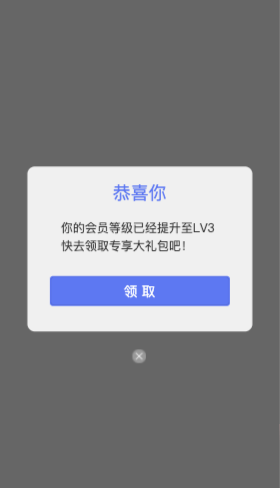
6.1 代码接入
在小程序中选择一个页面来预览弹窗与测试弹窗发送,比如选定 pages/popup-test/index 来作为测试页面,需要在该页面 index.tsx 代码文件加入下述代码:
import React, { Component } from 'react';
import { View, Block } from '@tarojs/components';
import './index.less';

export default class PopupTest extends Component {
  componentWillMount() {
    const data = Taro.getCurrentInstance();
    const scene = decodeURIComponent(`${data.router?.params.scene}`);

    function showData() {
      if (Taro.getApp()?.$app?.gmp) {
        Taro.getApp()?.$app?.gmp.sdkContext.showWindowCode(
          scene,
          'pages/popup-test/index',
        );
      } else {
        setTimeout(showData, 500);
      }
    }
    setTimeout(showData, 2000);
  }

  render() {
    return (
      <Block>
        <View className="index"></View>

        {/* 这里加入gmp-popup组件 */}
        <gmp-popup gmpEventKey="gmp" />
      </Block>
    );
  }
}
6.2 GMP 平台侧配置
参考下图,将上述用于测试发送页面路径(例如: pages/popup-test/index ),配置到「预览扫码预览路径」里
6.3 预览弹窗
点击 「微信小程序弹窗」 - 「预览」,扫码即可预览弹窗
在 「触达任务」 - 「触达配置」里,可以点击「测试弹窗」,扫码也可测试弹窗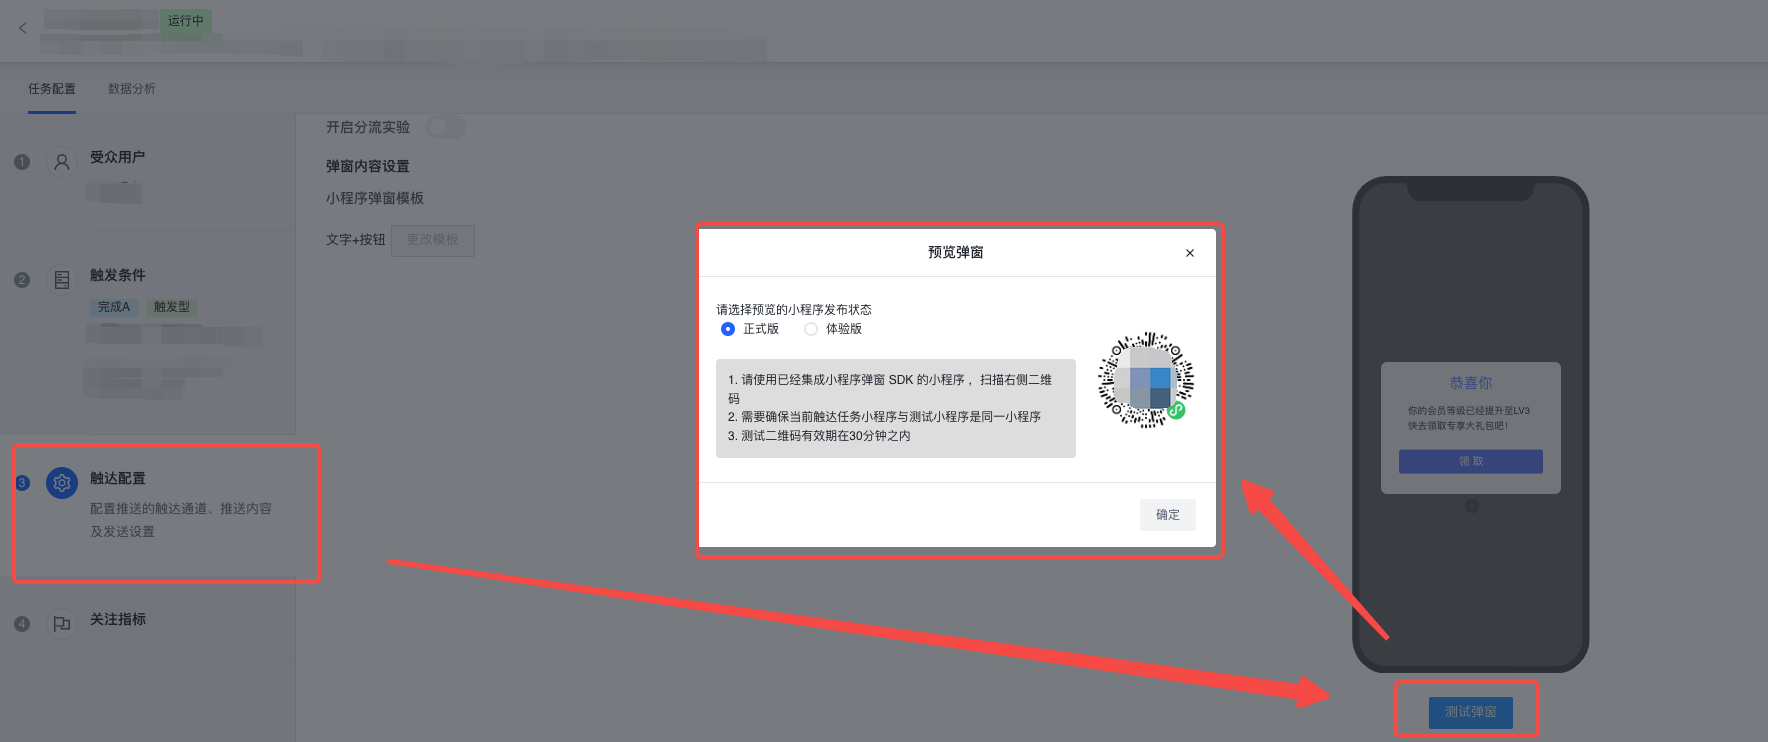
8.1 弹窗没有正常弹出
检查
GmpSdk.init配置的success回调是否有进入检查SDK初始化后,是否正常触发
gmp/openapi/v3/miniprogram_popup/getMiniProgramOpenId、openapi/v3/miniprogram_popup/getMiniProgramTask接口,有无出现接口报错检查希望出现弹窗的页面是否正常接入了弹窗组件,页面中元素是否出现
gmp-popup标签,是否在触发事件后出现内容
8.2 数据分析展示异常
检查异常的数据分析的项目id和初始化时传入的项目id是否一致
检查DataFinder的SDK是否正常接入以及是否触发上报函数
检查DataFinder的上报函数是否存在异常,且在DataFinder中是否存在上报的数据