1 背景
DataLeap 中支持数据生产任务的工作流调度,火山引擎 E-MapReduce(EMR)集群内的 Airflow 组件也支持数据生产任务的工作流调度。如果在实际的使用场景中,既使用到了 DataLeap 中的工作流调度,也使用到了 EMR 集群内的 Airflow 中的工作流调度,并且需要配置两个工作流调度之间的依赖关系,您便可以参考本文中提供的 Shell 触发 Airflow 工作流执行方案,来满足您的使用场景。
2 方案概述
DataLeap 中支持 Shell 脚本类型的任务。Shell 脚本可以在您 EMR 集群所在的 VPC 内执行,因此可以通过该 Shell 脚本调用 EMR 集群内的 Airflow REST API,来触发 Airflow 工作流调度的执行,即可以实现 EMR 集群内 Airflow 工作流对于 DataLeap 中计算任务的依赖。
我们也建议您将 Airflow 中的工作流迁移到 DataLeap 平台上,实现:
- 更优、更便捷的数据开发和可视化调度配置;
- 任务的智能监控机制,提前预警,并感知任务运行状态;
- 保障任务运行所需资源,减少任务延迟产出等能力优势。
我们将为您提供整体迁移支持及服务,帮助您轻松完成作业迁移和数据上云,提升数据研发效率,降低任务运维管理成本。
3 使用前提
- 已开通 DataLeap 服务。
- 已创建包含 Airflow 组件服务的 EMR 集群。详见创建集群。
- 如子账号登录,需具备服务使用权限,如 DataLeapFullAccess、EMRFullAccess 等权限。
- Shell 任务访问私有网络服务或资源时,需通过独享计算资源组访问,Shell 任务界面不支持单独修改网络配置。独享计算资源组操作详见资源组管理。
注意
- 若仅开通 Dataleap 大数据集成服务,不支持创建 Shell 任务。
- 独享计算资源组绑定的私有网络、子网、安全组信息,需和 EMR 集群中的网络配置信息保持一致,便于网络互通。
4 Airflow 工作流配置
4.1 Airflow DAG 文件编写
登录 EMR 集群 Master 主节点。登录方式详见登录集群。
使用以下命令,创建并编辑 Airflow DAG 的工作流文件,以 py 格式创建:
vim airflow_test.pyPlain参考以下 Airflow 官网示例,在 airflow_test.py 文件中编写 DAG 脚本:
""" ### Tutorial Documentation Documentation that goes along with the Airflow tutorial located [here](https://airflow.apache.org/tutorial.html) """ # [START tutorial] # [START import_module] from datetime import datetime, timedelta from textwrap import dedent # The DAG object; we'll need this to instantiate a DAG from airflow import DAG # Operators; we need this to operate! from airflow.operators.bash import BashOperator # [END import_module] # [START instantiate_dag] with DAG( 'tutorial', # [START default_args] # These args will get passed on to each operator # You can override them on a per-task basis during operator initialization default_args={ 'depends_on_past': False, 'email': ['airflow@example.com'], 'email_on_failure': False, 'email_on_retry': False, 'retries': 1, 'retry_delay': timedelta(minutes=5), # 'queue': 'bash_queue', # 'pool': 'backfill', # 'priority_weight': 10, # 'end_date': datetime(2016, 1, 1), # 'wait_for_downstream': False, # 'sla': timedelta(hours=2), # 'execution_timeout': timedelta(seconds=300), # 'on_failure_callback': some_function, # 'on_success_callback': some_other_function, # 'on_retry_callback': another_function, # 'sla_miss_callback': yet_another_function, # 'trigger_rule': 'all_success' }, # [END default_args] description='A simple tutorial DAG', schedule_interval=None, start_date=datetime(2021, 1, 1), catchup=False, tags=['example'], ) as dag: # [END instantiate_dag] # t1, t2 and t3 are examples of tasks created by instantiating operators # [START basic_task] t1 = BashOperator( task_id='print_date', bash_command='date', ) t2 = BashOperator( task_id='sleep', depends_on_past=False, bash_command='sleep 5', retries=3, ) # [END basic_task] # [START documentation] t1.doc_md = dedent( """\ #### Task Documentation You can document your task using the attributes `doc_md` (markdown), `doc` (plain text), `doc_rst`, `doc_json`, `doc_yaml` which gets rendered in the UI's Task Instance Details page.  """ ) dag.doc_md = __doc__ # providing that you have a docstring at the beginning of the DAG dag.doc_md = """ This is a documentation placed anywhere """ # otherwise, type it like this # [END documentation] # [START jinja_template] templated_command = dedent( """ {% for i in range(5) %} echo "{{ ds }}" echo "{{ macros.ds_add(ds, 7)}}" echo "{{ params.my_param }}" {% endfor %} """ ) t3 = BashOperator( task_id='templated', depends_on_past=False, bash_command=templated_command, params={'my_param': 'Parameter I passed in'}, ) # [END jinja_template] t1 >> [t2, t3] # [END tutorial]pythonDAG 文件完成编写后,通过以下命令,将文件分发至集群下各个节点中:
dagdispatch ./airflow_test.pyshell切换至集群其他节点中查看是否已分发成功:
## 切换至 core 节点 ssh emr-core-1; ## 进入 dags 目录位置 cd /usr/lib/emr/current/airflow/dagsshellls 查看 dags 下所有的文件,airflow_test.py 文件存在 core 节点的 dags 中,即表明已分发成功。

4.2 登录 Airflow UI 界面查看
说明
Airflow UI 访问链接登录条件如下:
- 集群的访问链接需要 emr-master-1 节点的 ECS ID 实例绑定弹性公网IP。详见绑定公网IP。
- 需要在集群详情 > 访问链接 > 配置服务端口中,给源地址和对应端口添加白名单才可继续访问。
- 获取 Airflow UI 访问链接登录用户名密码:
- 登录 EMR 控制台。
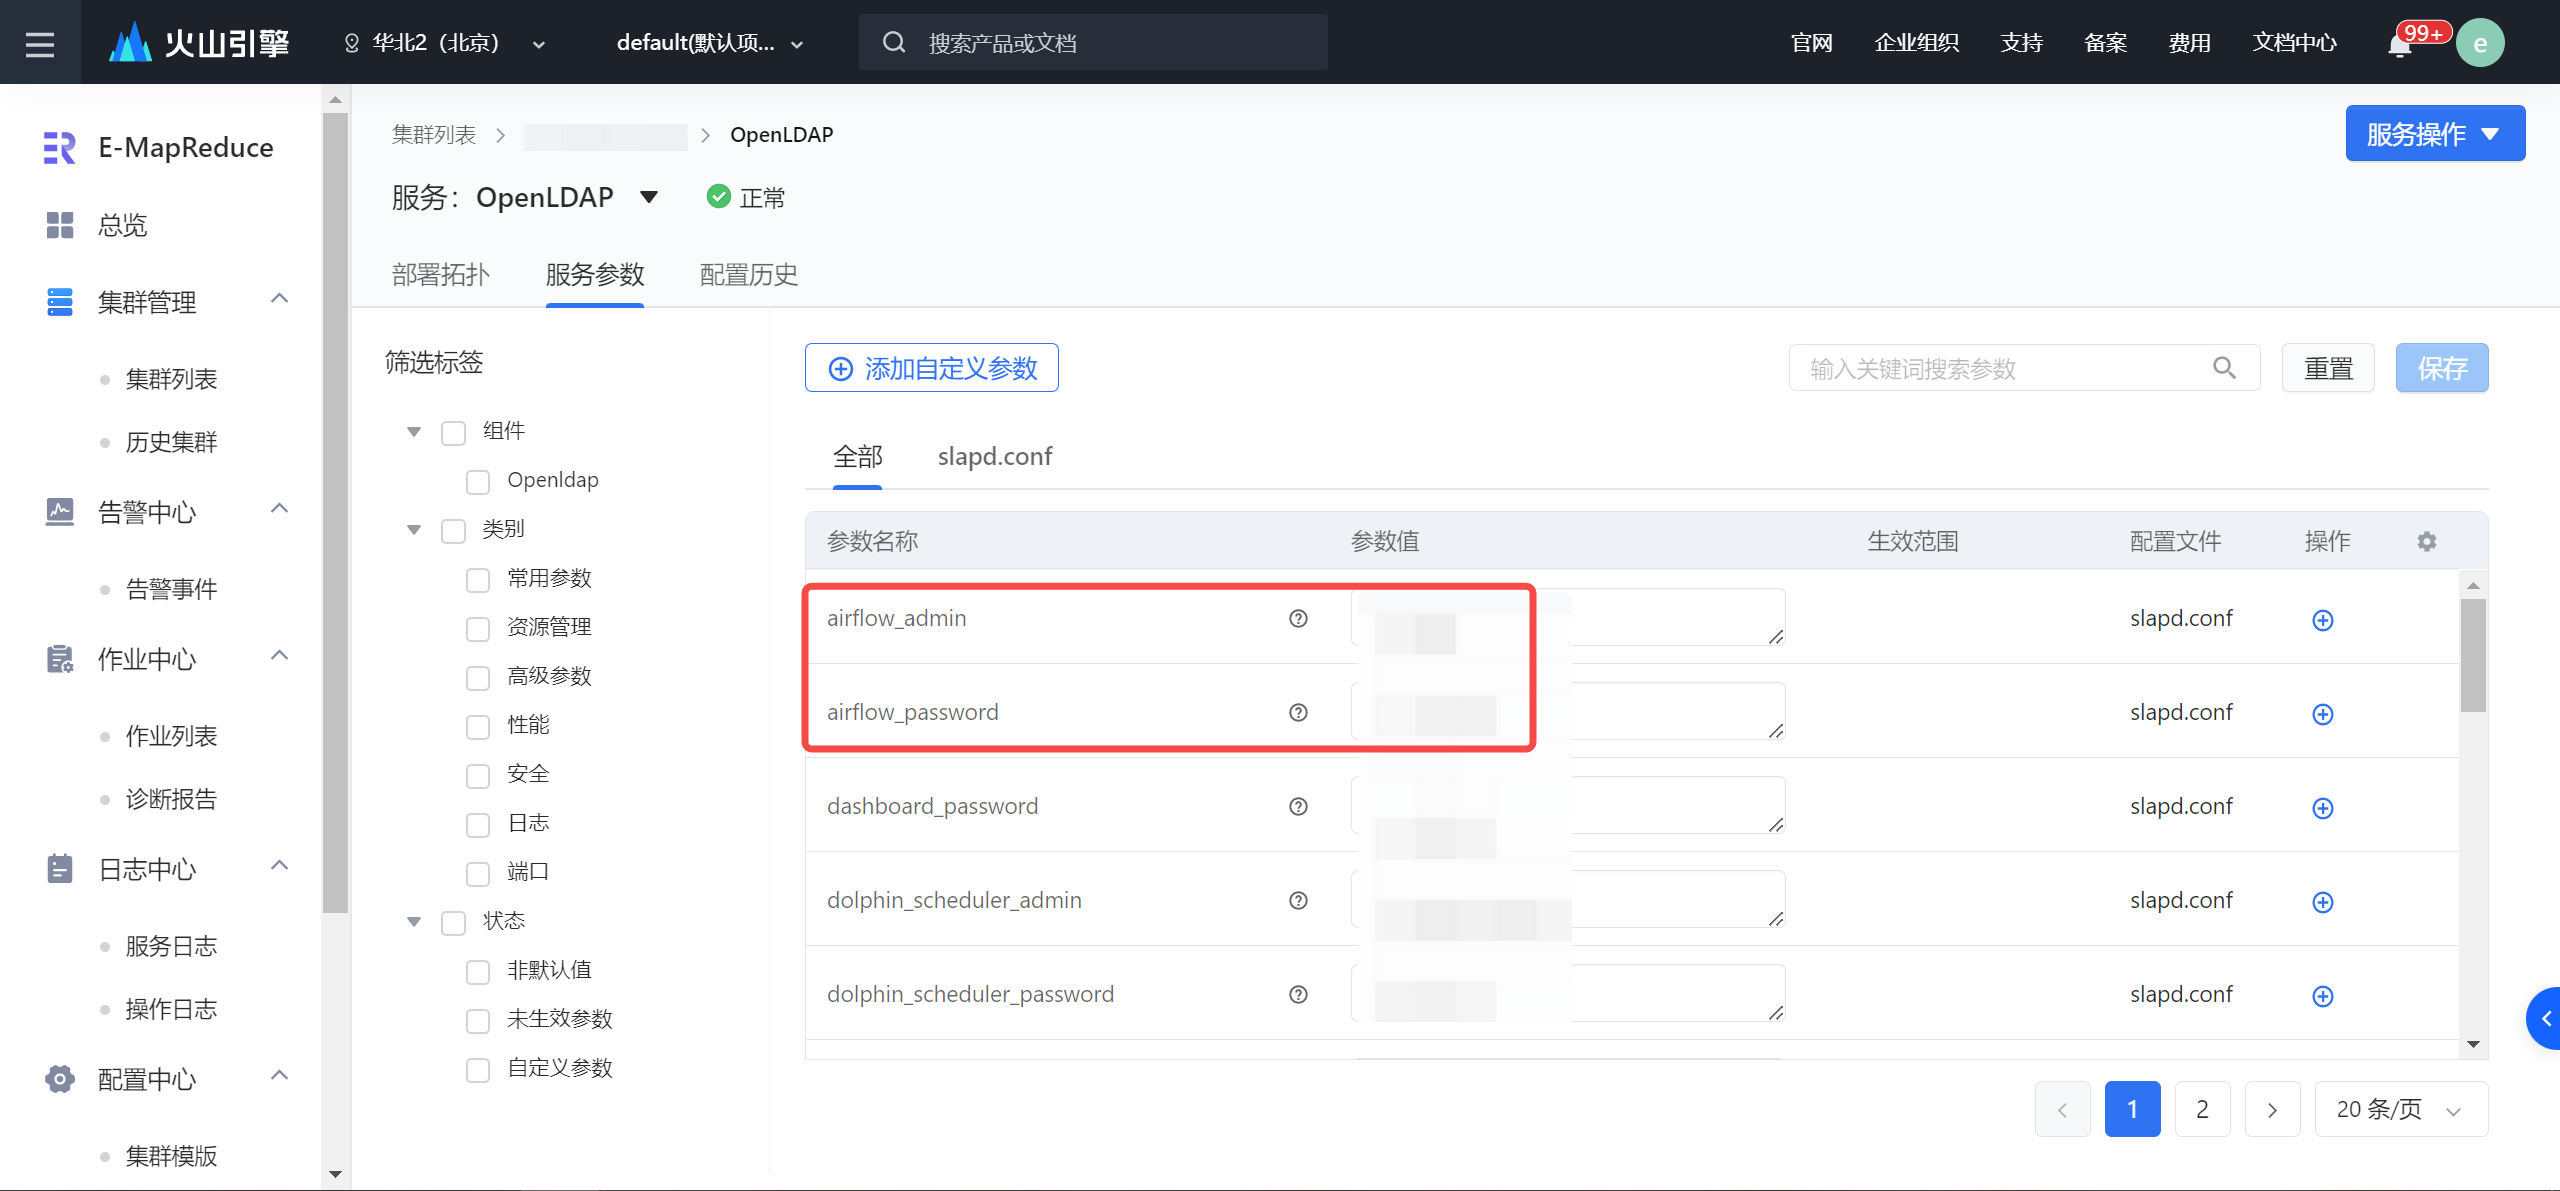
- 在左侧导航栏中,依次单击集群管理 > 集群列表 > 集群详情 > 服务列表 > OpenLDAP 服务 > 服务参数按钮,进入 OpenLDAP 服务参数界面。
- 获取 Airflow 用户登录信息,并记录。

- 返回集群详情界面,进入访问链接页签,单击 Airflow UI 访问链接,并输入获取的用户名密码信息,登录 Airflow UI 控制台界面。更多访问操作详见访问链接。
- 在控制台首页,您可以看到名为 tutorial 的 DAG 工作流。

某些情况下,您可能在界面上暂时看不到该 DAG,可前往常见问题了解详情。
4.3 内网 IP 信息获取
- 登录 EMR 控制台。
- 在左侧导航栏中,进入集群管理 > 集群列表界面。
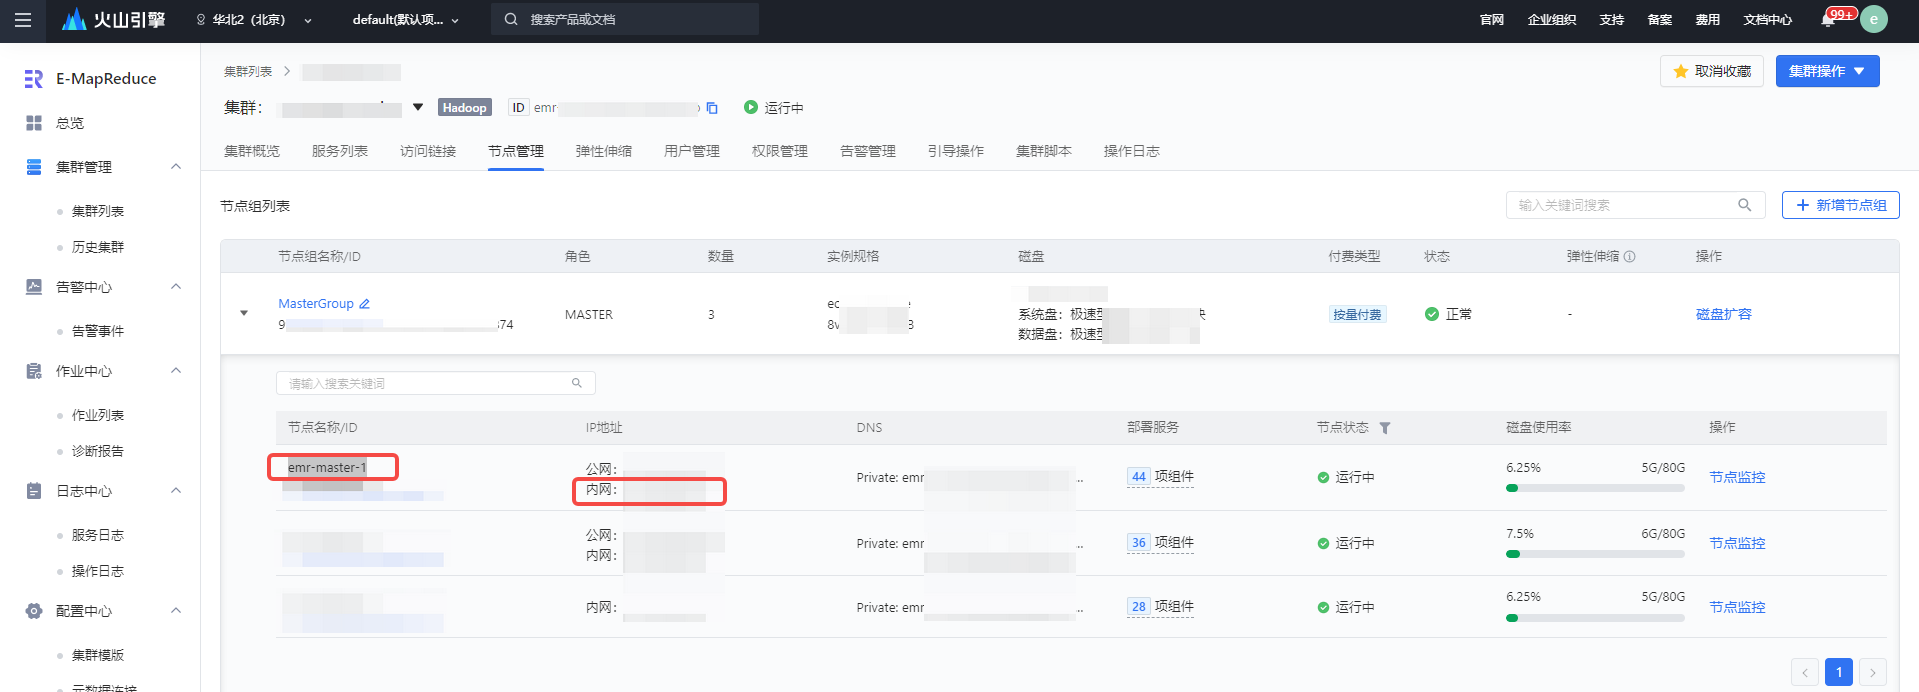
- 单击已创建好包含 Airflow 组件的 EMR 集群名称 > 节点管理,进入到节点组列表界面。
- 展开 MasterGroup 节点组名称,查看 emr-master-1 节点,获取 Airflow 的内网 IP 地址。

4.4 修改 auth_backends 参数
Curl 触发 Airflow API 需经过用户认证,需前往服务参数页面,修改 auth_backends 配置参数。用户认证详情请参考:https://airflow.apache.org/docs/apache-airflow/stable/administration-and-deployment/security/api.html。
- 进入包含 Airflow 组件的 EMR 集群名称 > 服务列表 > Airflow 服务 > 服务参数界面。
- 在搜索框中搜索 auth_backends 参数,在集群默认的参数值上,再添加参数值:
airflow.api.auth.backend.basic_auth。
- 参数添加后,单击保存按钮,在弹窗中填写操作备注,并单击右下方确定按钮,完成 auth_backends 参数修改。
- 单击右上角服务操作 > 重启按钮,重启 Airflow 服务。
5 配置 Shell 任务
- 登录 DataLeap租户控制台。
- 在概览界面,显示加入的项目中,单击数据开发进入对应项目。
- 在任务开发界面,左侧导航栏中,单击新建任务按钮,完成新建任务配置。详见 Shell 任务。
5.1 配置脚本
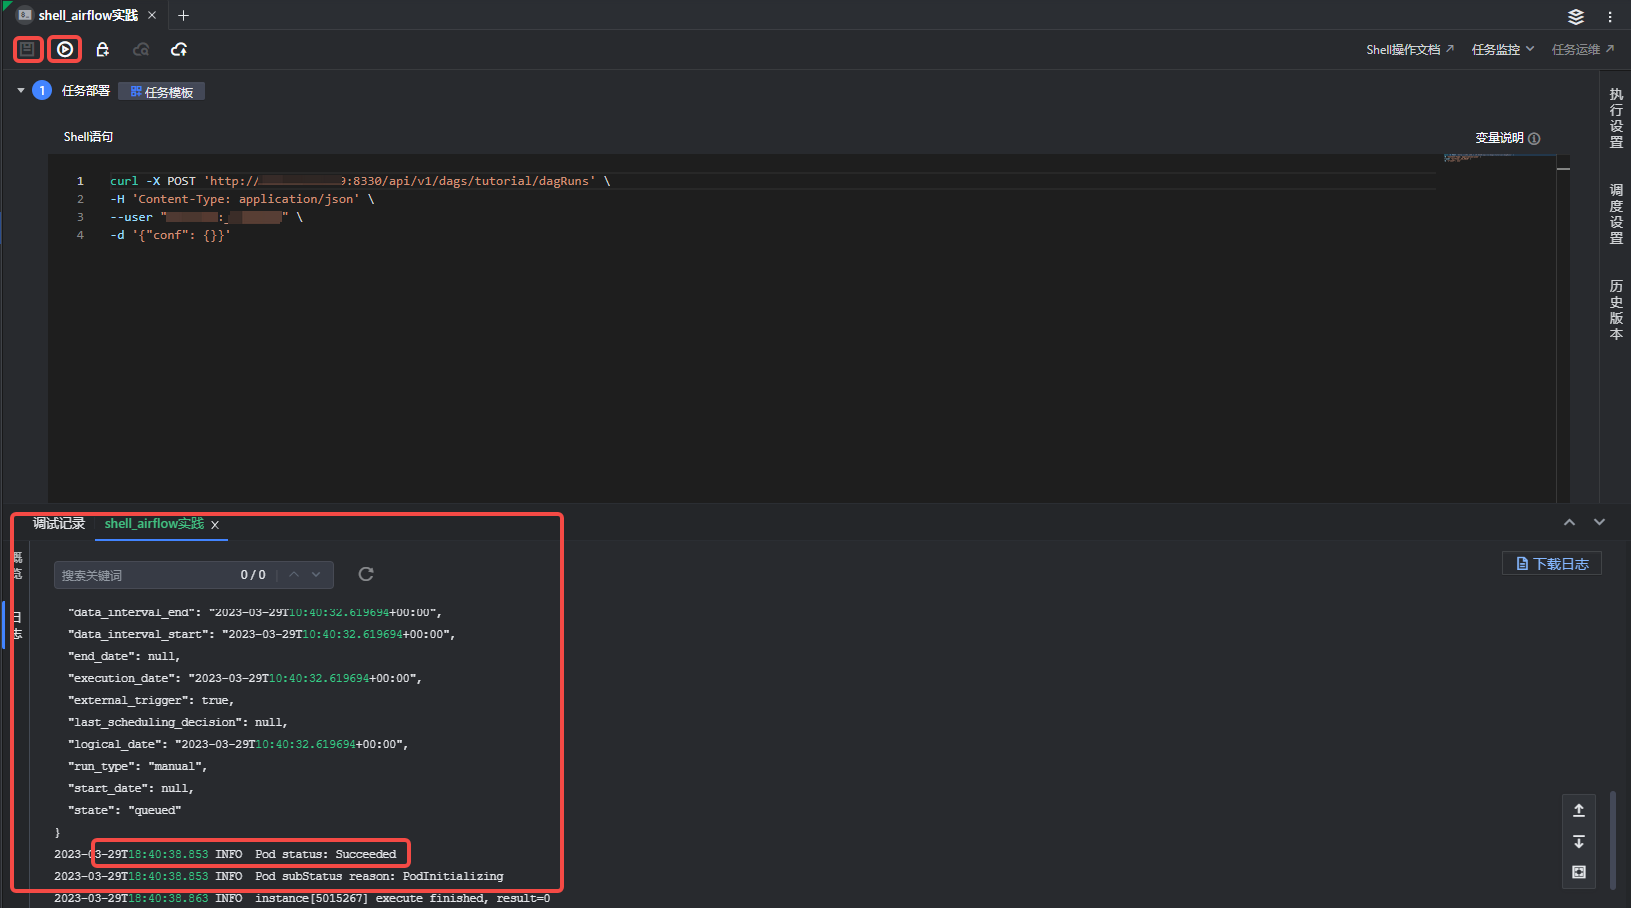
任务完成新建后,进入 Shell 任务编辑界面,编写 Shell 脚本,可以通过 curl 调用集群内 Airflow 的 REST API,触发 Airflow 的行为:
curl -X POST 'http://ip:port/api/v1/dags/{dag_name}/dagRuns' \ -H 'Content-Type: application/json' \ --user "username:password" \ -d '{"conf": {}}'shell
更多 API 调用方式,详见 Airflow API
替换参数说明:
参数 | 说明 |
|---|---|
IP | EMR 集群中 Master 节点内网 IP 信息。详见 4.3 内网 IP 信息获取。 |
port | EMR 集群中 Airflow 组件的 Web 端口号配置,可以在 Airflow 的集群详情 > 服务参数配置页面中查询到:
|
{dag_name} | 填写 Airflow UI 控制台界面显示的 DAG 名称信息,示例中填写为 tutorial。 |
username | 在 OpenLDAP 的服务参数配置页面中查询 Airflow 登录的用户名信息:airflow_admin 参数对应的值。 |
password | 在 OpenLDAP 的服务参数配置页面中查询 Airflow 登录的用户密码信息:airflow_password 参数对应的值。 |
-d | 根据实际场景,可输入对应的请求参数。 |
5.2 执行设置
脚本配置完成后,您可进行以下操作,完成任务执行资源配置:
- 单击进入右侧侧边栏执行设置窗口。
- 选择计算资源组:下拉选择独享计算资源组。
- 镜像地址:此示例用 curl 方式触发 Airflow API 执行,镜像地址为空。
- 资源配置:资源可根据实际需求进行配置,以 CU 为单位,默认配置 1CU(1CU = 1Core 4GB),下拉可选择更高规格的资源配置。
5.3 网络设置
在选取独享计算资源组设置后,网络配置中会默认将独享计算资源组绑定的私有网络、子网、安全组信息填入,且不可修改。
您可在创建独享计算资源组时,配置对应的私有网络信息,需和 EMR 集群中的网络配置信息保持一致,便于网络互通。创建资源组操作详见:资源组管理。
5.4 任务产出设置
产出数据登记用于记录任务的数据血缘,不会对代码逻辑造成影响,此示例选择默认。
- 引擎类型:E-MapReduce(EMR)和湖仓一体分析服务(LAS)、默认(没有产出登记)。
- 关联实例:选择关联对应引擎下的实例信息。
- 数据类型:仅 EMR 引擎类型下需选择数据类型,目前有 Hive、HDFS、其他。
- 数据库表:选择对应引擎下产出的数据库和数据表。
6 保存运行任务
任务配置完成后,依次单击上方操作栏中保存和调试图标按钮,执行编辑好的 Shell 命令,执行成功后,可在界面下方查看运行日志和 API 返回参数信息。
7 结果验证
- 登录 Airflow UI 控制台,详见 4.2 登录 Airflow UI 界面查看。
- 刷新界面后,可看到 DAG 实例上次运行的时间信息。

- 运行完成后,您可在 Airflow UI 控制台查看详细的 DAG 日志信息。更多操作详见 Airflow 官网。
8 提交任务
结果验证确认无误后,您可进行后续的调度设置和将任务提交发布到运维中心离线任务运维中执行。
- 调度设置:
在右侧导航栏中,进入调度设置界面,您可以在此设置调度资源组、调度属性、依赖关系等信息,详细参数设置详见调度设置。 - 提交发布:
单击操作栏中的保存和提交上线按钮,在弹窗中,需先通过提交上线流程,最后单击确认按钮,完成作业提交。详见5.1 离线任务提交。
后续任务运维操作详见:离线任务运维。